
🎒 Resources
- GitHub Repository for the Sample Project
- Bld - The Pure Java Build System
- RIFE2 - a Full-Stack Framework for Modern Java
I came across Bld while searching for the perfect build tool for monorepos (spoiler: I haven’t found it yet). Although Bld wasn’t exactly what I was looking for, I found it interesting enough to experiment with. As someone who values simplicity, I liked the idea of using the same language for both the project and the build process.
In this post, I’ll share my experience with Bld and guide you through a small project to see if it worth your time to explore further. Finally - as every rose has its thorn - I’ll discuss the trade-offs of using Bld instead of more established build tools like Maven or Gradle.
🤔 What is Bld Anyways?
bld was created because we’re not really interested in build tools. We use them because we have to, but we’d rather just get on with coding the real stuff.
Source: RIFE2
Bld is a lightweight build tool for the Java ecosystem. It approaches the build process differently than most other tools in the market: there is no Groovy-based DSL, no XML files to work with. Instead, you can define the entire build process using plain Java.
💡 If you know Java, you already know how to work with Bld.
It allows you to build faster by eliminating the burden of cognitive switching between your build logic and your project code. While it may not significantly reduce build times, it offers the advantage of using the same language for both your project and the build process. No more awkward or verbose file formats, outdated tools or unsupported environments - it is just Java: write once, run everywere, right?
If you dig a bit deeper you might come across the name RIFE2, which is a full-stack Java framework. I must admit that I’ve never heard about this project before. Anyways, Bld was started as an in-house tool for building RIFE2, but it has since evolved into a standalone project. Thank you, RIFE2 Team! 🙏
Alright. Let’s see how it works.
⏩ If you’re not interested in the technical details, but want to see an executive…ish summary, jump to the Conclusion section.
🚀 Getting Started with Bld
Before we jump into the details, I must mention that Bld requires Java 17 or later to run. After all, it’s always a good idea to keep up with the latest and greatest LTS version of Java.
Installation
You have more than one option to get Bld up and running. My suggestion depends on your intentions:
For a quick evaluation & new projects: Use the dedicated Bash script to scaffold a new project with Bld baked in. This is what we’ll do in this tutorial.
Install Bld globally: If you plan to go all-in with Bld, you can install it globally. I personally recommend using SDKMAN for this purpose:
sdk install bld.
Creating a New Project With Bld
As I mentioned, we’ll scaffold a new project using Bld. To do this, run the following command:
| |
You’ll be prompted to select the project type. Choose base (1) for now. Next, specify the package name and the project name. Here is what I’ve done for this tutorial:
| |
Let’s see what we have now. Execute the bld tool:
| |
Great! We have a new project with Bld set up. Let’s see our build setup in action:
| |
👷 Bld in Action
But what’s inside? Let’s put aside the ‘Hello World!’ stuff for a moment and concentrate on the bld directory in src. What is in there? At first sight, it looks like a regular Java project structure:
| |
Look Ma, No XML!

The BackendBuild.java file is where the magic happens: this is where you define your build process. As you can see, there are no pom.xml or build.gradle files anywhere, so we can start dissecting the BackendBuild.java file right away.
| |
The pkg, name, mainClass, and version fields might look fishy at first in the constructor. These protected fields from the BaseProject class provide a concise way to set our project’s metadata such as the package name, the project’s name and its version. The repository setup is worth a look - as you can see -, Bld stands on the shoulders of Maven Central as the number one source of dependencies. Because Bld is pure Java, you can add a custom one hands-down if you have to: look at the Repository record for a hint.
No need to worry - for this tutorial, we are perfectly fine with all that Maven Central has to offer: we are going to build a tiny service powered by Spring Boot.
Adding Dependencies & Plugins
Bld offers a plugin system (here plugins called extensions) to extend its capabilities - like Maven or Gradle. For this tutorial we need the bld-spring-boot extension, which provides a simple way to build Spring Boot applications with Bld.
Open the lib/bld/bld-wrapper.properties file and add the following dependency using the Gradle shorthand notation:
| |
Now comes the most cumbersome part of working with Bld: you have to specify the dependencies in the BackendBuild.java file. For Maven or Gradle - you are in good hands with the Spring Initializr or you can rely on your IDE to help you out. But with Bld - at least for now - you have to do it manually.
So open the BackendBuild.java file and add the following changes:
- Change the
BackendBuildclass to extendWebProjectinstead ofBaseProject(line 1). - Add the
spring-boot-starterandspring-boot-starter-webdependencies to thecompilescope (line 18). - Add the
spring-boot-starter-test,junit-jupiter, andjunit-platform-console-standalonedependencies to thetestscope (line 25). This is necessary to run the unit tests.
| |
I believe it’s important to provide further clarification on a few points. You may have noticed the VersionNumber constants in the code. It’s something like defining a <property> in Maven - but in a more idiomatic way. The javaRelease field may be familiar; think of <maven.compiler.source> and <maven.compiler.target> in Maven. The autoDownloadPurge field will save you from running ./bld download every time you’ve added a new dependency.
Here you can experience the satisfaction of working with Bld: we set up a lot of things in a single file using nothing but Java. Do not stop here! Let’s specify the project’s dependencies via a Fluent Interface - which is a nice touch in my opinion: you need to set a scope(), then just include() the dependency() as needed. Again, it’s Java, nothing else.
Now you know how to define your build process using pure code. While it may seem daunting at first, it becomes easier as you become familiar with Bld. Relying on the IDE’s auto-suggestions or an AI assistant can help you stay in the flow and bring some joy to the tedious task of defining build configurations. ✨
🐶 Defining the Sample Project

I’ve prepared a small REST API to list dog names & breeds. Both feature has its own endpoint:
| Endpoint | Description |
|---|---|
/dogs/names | Returns a list of dog names |
/dogs/breeds | Returns a list of dog breeds |
Each endpoint has its own Controller and Service. The project is intended to be a demonstration of how to build a Spring Boot application with Bld, rather than a tutorial on creating Spring Boot microservices. Therefore, I’ll skip the detailed explanations for now. Please check out the code on the GitHub repository and bear with me:
| |
Building & Running the Spring Boot Application
Let’s fetch all the dependencies, compile the code, and run the application:
| |
Shortly, you will be able to access the service at http://localhost:8080/dogs/names and http://localhost:8080/dogs/breeds.
Let’s verify it:
| |
Here we go:
| |
…and for the dog breeds:
| |
Here I’ve formatted the response for brevity:
| |
Building an Executable (“fat”) Jar
Now, stop the service and try to build a so-called “fat” jar - a JAR file that contains all the dependencies needed to run the application.
To make it happen, we need to wire the bld-spring-boot Extension’s BootJarOperation to our build logic: add this method to the BackendBuild.java file:
| |
This method is annotated with @BuildCommand, which indicates that it is an entry point for a custom command in Bld. We will discuss Custom Commands and Bld Operations soon, for now it’s enough to know that this method will create the executable JAR file of our Spring Boot application.
Let’s try it in action:
| |
After that, run the generated JAR file:
| |
The result should be the same service running with bld run. Congratulations! You have successfully created a fully functional, deployable microservice. 🎉
Now add an extra step to the build process: we are going to enrich our dog breed list with some AI-generated data.
🛠️ Extending Bld - Custom Commands and Extensions
As we know, Bld supports plugins, called extensions, to enhance its functionality. These extensions offer ready-to-use solutions for your tasks, so no need to write the logic yourself. For example, in the previous section, we used the bld-spring-boot extension.
However, there’s an even simpler way to customize the build: creating custom commands!
Custom Commands in Bld
Custom commands are essential for extending Bld. If you need to quickly add an extra task to your build process and are confident you won’t need it again, a custom command is your best friend. Here’s a secret: custom commands serve as the entry points for extensions, which is why we begin by writing one.
Let’s create a custom command to generate a CSV file with dog breeds. Instead of just spitting out a CSV file — which is boring — we’ll use Ollama and a locally running LLM to make it more interesting.
Sure, using an AI model to generate this list might seem a bit unusual, but it’s a great way to demonstrate how easily you can add new functionality to Bld.
Here is a class named BreedGenerator - very stupid name, I know - that will do the job:
| |
Let me explain the details here. The PROMPT constant instructs our model (in this case llama3.1) to provide a CSV file with exactly 10 breed entries - including the header.
The public generate() method is the entry point of the command. This is what we are going to use in our custom command.
One important thing, before we move on: as you might have noticed, we are using an external dependency: jackson-jr. We need to add it to our project.
Open the lib/bld/bld-wrapper.properties file and add the following line somewhere:
| |
So what is this bld.extensionsforcommands property? According to the documentation:
Any property starting with bld.extension, can contain a comma-seperated list of extensions in the common dependency description format groupId:arfifactId:version.
I thought it would be a good idea to separate the dependencies for the custom commands from the extensions. Feel free to put all on the same line, if you prefer it that way.
Now as the dependencies are sorted, let’s create the custom command itself. Open the BackendBuild.java file and add the following code:
| |
The generateBreeds() method is annotated with @BuildCommand, which indicates that it is an entry point for a custom command in Bld. The parameters are:
summary: A short description of the command that is displayed in the summary of all supported commands.value: The actual name of the command, which in this case isgenerate-breeds.help: A class that provides detailed information about the command, specified asBreedGeneratorHelp.class.
Finally, we need to create the BreedGeneratorHelp class. This class will provide more control over the help message displayed when the user runs ./bld help generate-breeds. Do not expect anything complicated here:
| |
🤔 Unfortantely, I couldn’t find any documentation about the topic parameter in the getDescription() method. Its value is always the command’s name, so I think it is safe to ignore it. 🤷
Custom Command in Action
Now that we have everything in place, let’s see what’ve we done:
| |
Fantastic.
✅ Bld is now capable of producing a list of dog breeds with the generate-breeds command.
❓ And what about the detailed help message we provided via BreedGeneratorHelp?
| |
Okay, we’e seen enough, it’s time to generate the CSV file using Ollama:
| |
Now you can check the src/main/resources/dog-breeds.csv file to see the list of dog breeds:
| |
Naturally, the list will differ on your machine since it’s generated by an AI model. 🤖
Before we proceed, let’s ensure our REST API actually uses the new data.
| |
Access the /dogs/breeds endpoint and - fingers crossed - you should see the new dog breeds in the response:
| |
The response:
| |
✅ The AI-powered dog breed list - provided by our build tool - is now available in our REST API.
Make an Extension Out of It!
Custom commands are great, but they have their limitations: Reusing them across different projects and teams can be cumbersome. So if your command is more than a one-time show, consider turning it into an extension.
Let’s turn our dog breed generator command into an extension. 🐶
⏩ Not interested in every detail? Let’s cut to the chase: you can check out the final result from the feature/breed-extension branch on GitHub & jump to the building part.
First, create a new project for the extension with the same command we used at the beginning of this tutorial:
| |
☝️ Do not forget to cd out from the
backenddirectory before running the command!
The process is very similar to what we did with the backend project. The only difference is that you should create a lib project, so choose 3, when asked.
| |
We need to take two actions to transform our command into an extension:
- 👷 Extract the code from the Custom Command into the newly created 2nd project.
- 📐 Refactor the logic to align better with Bld extensions’ structure.
It may seem like a big task, but as you’ll see, we’ll finish it in no time.
Extract the Code
Before we start, let’s remove all the Bld-made code from the breedgenerator project: BreedgeneratorLib.java and BreedgeneratorTest.java.
We need only these files and directories:
The
src/main/javaandsrc/main/resourcesdirectories will be populated with the code and resources of the new extension.The
src/bld/java/com/github/tcsizmadia/dognamesdirectory will contain the build logic.
Start with the latter:
| |
We already know the pkg, name, version and repositories fields and defining dependencies using the scope() method.
Because we are developing an extension for Bld, we need to include Bld itself as a dependency. Additionally, the jackson-jr library is also a build-time dependency. This means we no longer need the bld.extensionsforcommands property in the lib/bld/bld-wrapper.properties file in the backend project.
💡 It’s a good idea to have all the dependencies downloaded before we start coding.
Ask Bld to do it for you:
| |
👏 Much better! Missing dependencies and the lack of auto suggestions - solved!
Next, let’s move the BreedGenerator class from the backend module to the src/main/java/com/github/tcsizmadia/dognames directory.
We need to make a few changes to the class:
We will no longer hardcode the model name, the base URL of the LLM Provider (that is Ollama) and the destination path. These values were based on my personal preference, but for a decent build experience, we should provide a way to configure them.
The
generate()method now returns abooleanvalue to indicate whether the generation was successful - or not. We will use this return value to make the build fail or succeed based on the result.
Here is the updated BreedGenerator class:
| |
Thank you for bearing with me. Now comes the fun part:
Implement an Operation
The last step is to expose our logic in an implementation of the AbstractOperation class. Here is the BreedGeneratorOperation class (still, I can’t name my classes properly):
| |
The fluent API might be familiar to you from the bld-spring-boot extension. We will work in the same way, beacuse we are good citizen of the great Bld realm.
The
fromProject()method is essential as it allows the operation to access the project’s metadata and directory paths. We’ll use the providedBaseProjectinstance to ensure the generated CSV files are placed in the correct location: the project’ssrc/main/resourcesdirectory. I apologize for the unorthodox practice of putting generated files in the resources directory, but as it’s a demo project, I hope it’s acceptable. 🙏The
model(),ollamaHost(), andollamaPort()methods enable our users to configure the GenAI-related things. These values are optional since we have provided default settings.The
execute()method is where the magic happens ✨. We create a newBreedGeneratorinstance with the configured values and call itsgenerate()method. Based on the result, we set the project’s exit status.
The EXIT_SUCCESS and EXIT_FAILURE constants indicate whether the operation was successful or not (see the this.project.exitStatus() call at line 37).
Build & Publish the Extension
Now that we have everything in place, let’s build the extension:
| |
The extension is ready to be used. Well, almost. ☝️ We need to publish it to the local Maven repository.
| |
The process is very similar, if you need to publish the extension to a different repository (like Maven Central, for serious extension developers) - you should use the publish command.
Use the Extension
Now that we have published the extension, we can get rid of the custom command with all the related code in the backend project - and replace it with the extension.
Let’s switch back to the backend project and fix the dependencies in the lib/bld/bld-wrapper.properties file:
| |
☝️ Please do not forget to remove the
bld.extensionsforcommandsproperty, as I pointed out earlier.
Now, we need to update the generateBreeds() method in the BackendBuild.java file to use our fine extension:
| |
Nice and clean. ✨
Finally, remove the BreedGenerator.java and BreedGeneratorHelp.java classes from the src/bld/. directory. After fixing the import statements…
| |
…it’s time to test the extension in action!
| |
You should find your freshly generated dog breeds CSV file in the src/main/resources directory.
This time we used our brand new extension - in a nice and clean way. Fantastic job! Let’s finish this tutorial with a few closing thoughts.
🚀 Conclusion
“However, with Bld, authoring a custom command or even an extension feels so natural that you don’t even realize you’re writing one.”
Thank you for sticking with me through this - I must admit, quite long - tutorial. I hope you enjoyed the journey and learned something new about building your projects using Bld. Let’s summarize what we’ve done:
- We started with a simple Spring Boot application and built it using Bld, with Java code only.
- We added a custom command to extend the build process with an AI-generated dog breed list.
- We turned the custom command into an extension making it reusable across projects (and make our build process clean and neat).
After concluding our journey with a pure, Java-based build experience, it begs the question: is Bld the right tool? Should I replace Maven with it?
Well, I don’t think so. It’s not that Bld is a bad tool, but build tools aren’t like coffee brands; you can’t just switch from one to another on a whim.
I experimented with Bld for a few days before writing this tutorial, and I must say, I really enjoyed using Java files to describe, execute, and iterate over my builds.
I felt in control of every nuance of my builds and was tempted to write custom commands here and there to fix or enhance operations. I must confess, having never authored a Maven plugin, I can’t compare the two tools in terms of extensibility. However, with Bld, authoring a custom command or even an extension feels so natural that you don’t even realize you’re writing one.
This is something I’ve never experienced with Maven or any other build tool.
On the other hand, Bld is a newcomer, and isn’t as mature as Maven or Gradle — and it probably never will be. While you have the freedom to author your own extensions if you need a feature that isn’t available yet, you can’t expect to find a ready-to-use solution for every problem you encounter.
Yet again, Bld is faster than Maven and Gradle, but I’m afraid not significantly enough to be a decisive factor. Perhaps with a really large project, I might think differently. However, here’s the catch: would you start migrating your existing, likely mission-critical business projects to Bld?
Neither would I.
Also, like Maven or Gradle, Bld is not designed for building monorepos with mixed languages and technologies. You might be able to hack it using extensions, but you’ll never get the same experience as with Bazel, Buck or Pants (spoiler alert: one of them will be discussed here soon). Bld is for Java, period.
So Who Should Use Bld?
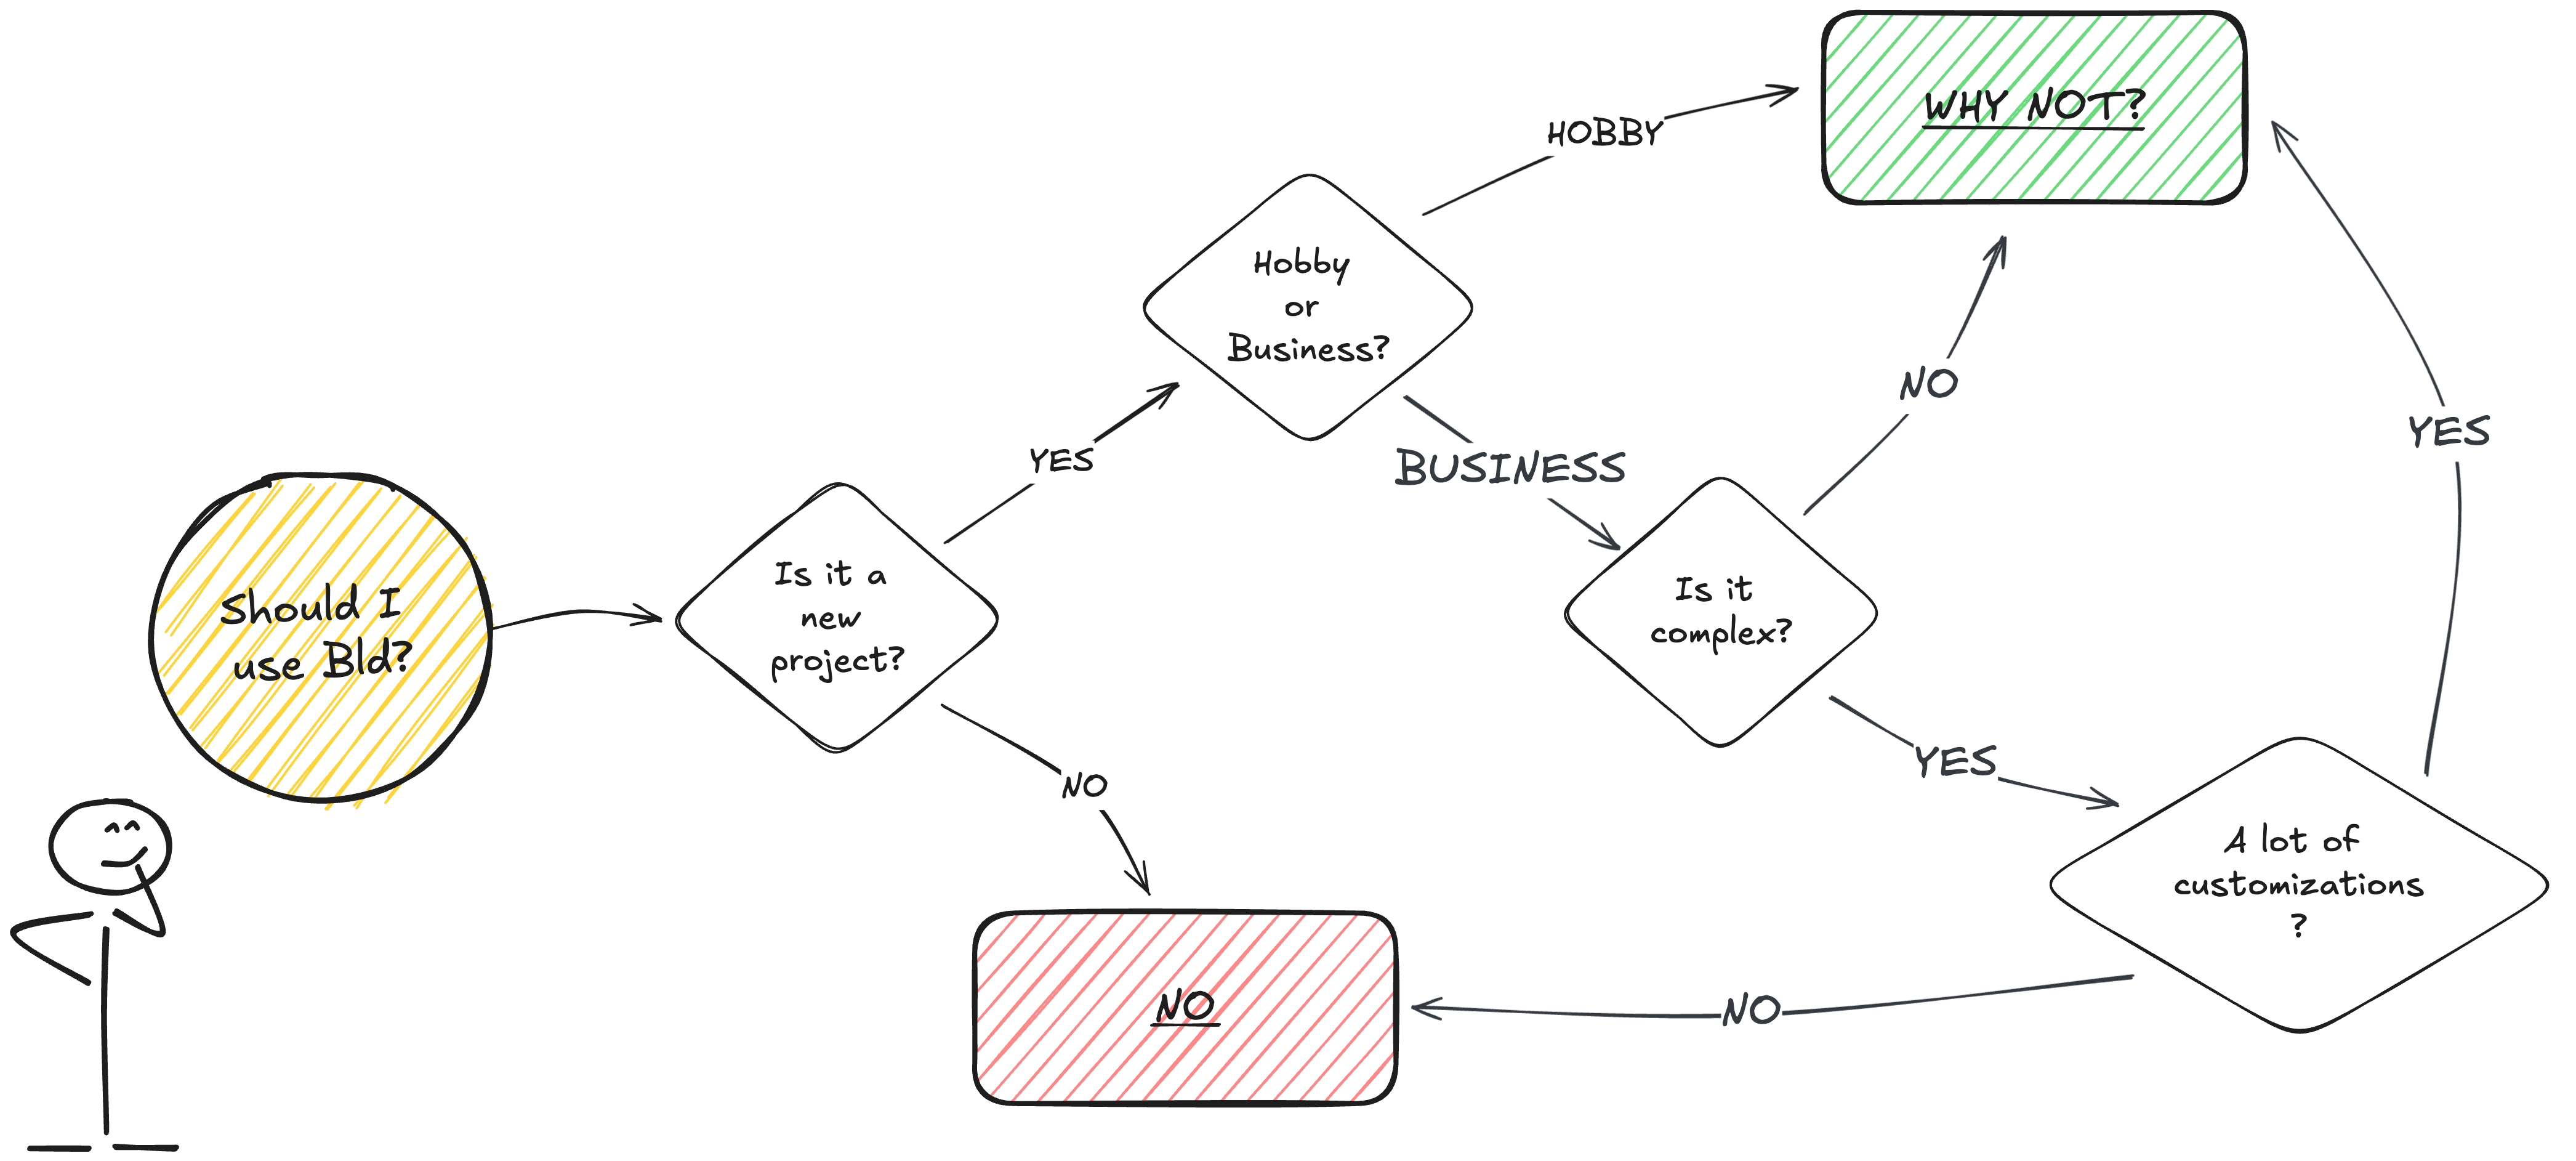
✅ For hobbyists and professionals working on small to medium-sized projects without tight budget or time constraints, Bld can be a great choice. It’s a joy to use, and defining the build process with Java code is a unique experience.
✅ Additionally, it might be a good remedy for those who need to apply a lot of custom logic in their builds, especially for challenging tasks that lack a ready-to-use plugin in Maven or Gradle.
❌ For business-critical projects already using Maven or Gradle, I would not recommend migrating to Bld.
❌ If you plan to start an open-source project, you might still want to stick with Maven or Gradle, as they are more widely used and can attract more contributors. Of course, no one stops you from using Bld alongside your pom.xml or build.gradle files. However, expect confusion and a lot of extra effort to maintain both build setups.
🤔 As a potential solution, I would like to see a tool that can generate Bld configurations from Maven or Gradle projects. This might work for one-time migrations. However, maintaining both build configurations presents a chicken-and-egg problem: you need a build tool to generate the configuration for another build tool. So, why not just use the original build tool directly? 🤷 To make this a feasible solution, the third-party tool must be Bld itself.
All of this could change in the future. If Bld can add new features, such as more performance boosts, better support for multi-module projects, and seamless migration from other tools, it might become a serious contender.
If I’ve kindled your interest in Bld, I encourage you to give it a try and share your thoughts with me. I’m curious to hear about your experience with this tool!