
🎒 Resources
📖 Introduction
Creating your own local AI assistant isn’t as simple as signing up for a commercial service, but it’s manageable — especially with tools like Ollama.
Why bother setting up your own AI assistant? Well, there are several reasons, but let me highlight a few:
🔒 Privacy: Probably the most important reason. In some situations, it’s crucial to strictly follow regulatory and company rules. A local AI assistant allows you to follow the rules while still benefiting from the technology.
🏃 Speed: Running an AI assistant locally can be faster due to lower latency, but in turn, you’ll need a decent machine.
🔧 Customization: That’s my favorite! Having your own AI assistant allows customization to meet your specific needs. Commercial, one size fits all solutions might lack features, such as integrating your company’s Wiki or Jira tickets with the assistant.
Sounds interesting? Let’s dive in!
🛠️ Setup Ollama
If you want to run your own AI assistant locally, you need to run a model locally. Often referred to as the “Docker of LLMs”, Ollama provides a seamless experience for running models on your machine. If you haven’t already installed it, visit the Ollama website and follow the instructions.
To verify that Ollama is installed correctly:
| |
So we have a provider: that’s Ollama, now we need to pull some models to use with it. No foundational models are created equal, some excel at code generation, others at autocompletion, and still others at conversations and reasoning. For our exercise, we’ll focus on the following two models:
| |
☝️ For faster code generation, or if you’re on a constrained environment (like a laptop), you can use the
codegemma:2bvariant.
After a couple of minutes, and almost 10 gigabytes less free space you should have the models ready to use. To verify that the models are installed correctly, run:
| |
Splendind. Let the fun begin!
🤖 Set Up Your AI Assistant(s)
We will explore two different setups in this tutorial. In the first part (you are here), we will use an AI assistant in Zed, a lightweight code editor with built-in support for AI assistants.
🔜 Then, we will move on to a more advanced setup using Continue and VS Code with Ollama as the provider.
Using a Model Locally With Ollama and Zed
Let’s begin with something simple. You might be familiar with Zed, the code editor with really fascinating response times - or perhaps you heard about it for the first time today. I have to tell you that the team behind Zed already made a top-notch code editor a few years ago. That editor was Atom - which you might recognize, if you are in the business of code crafting for a while. With Zed the team have made really bold commitments again:
Zed combines the power of an IDE with the responsiveness of a lightweight editor for productivity you can feel under your fingertips.
So, let’s talk about the AI assistant support: Zed not only a fast editor, but it also has built-in support for GitHub Copilot and allows you to use an LLM (GPT-4, by default) for various tasks like code generation, refactoring, and even having conversations within the assistant panel.
With Ollama, you can use your own LLM models with Zed, running them locally on your machine.
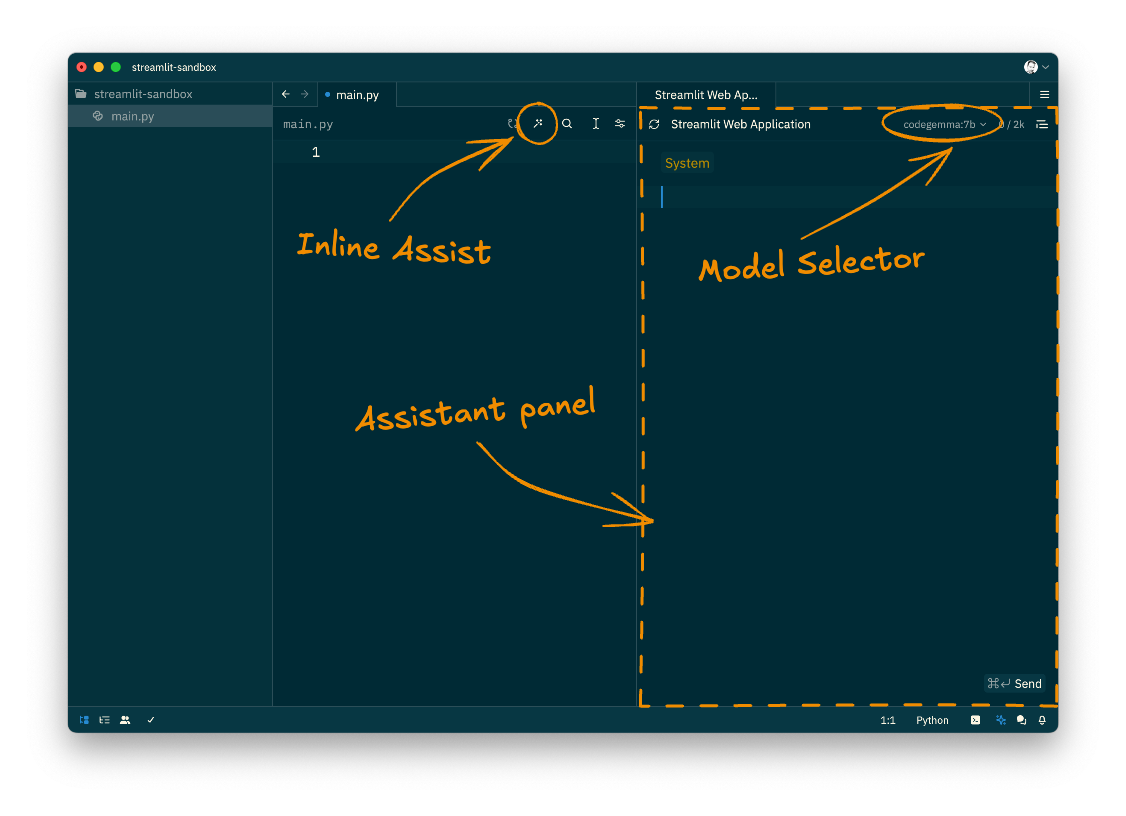
Configure Ollama with Zed
Open Zed and navigate to the settings by pressing CMD + , (on macOS). In the settings.json file, add the following configuration:
| |
Save the file and you’re all set! Now you can use the codegemma model with Zed. Let’s see it in action. Press CMD + ? to open the assistant panel (or click on the ✨ icon on the status bar).
The assistant panel will appear on the right side of the editor. It looks similar to the one in GitHub Copilot, but it is powered by the codegemma model you installed earlier. You can switch between different models and providers by using the drop-down menu in the upper right corner of the panel.
Give it a try and see how the AI assistant works in Zed!
I regret to inform you that one crucial aspect of using an AI assistant is currently unavailable in this setup: real-time code suggestions, a.k.a. “ghost texts”, only work with the GitHub Copilot, or the Supermaven integration. Considering the rapid pace of Zed’s development, I am confident that this will change in the near future.
☝️ If this is a deal breaker for you, I kindly ask you to wait for the 2nd part of my tutorial, where we will work with a more decent setup (Continue.dev with VS Code).
Scaffold a Streamlit App
We will create a simple, Streamlit flavored “hello world” application using our local AI assistant. Streamlit is a popular Python library for creating web applications with minimal effort. No worries if you are not familiar with Streamlit; it is not the focus of this exercise.
First, create a new directory, open it in Zed, then open the Assistant panel.
Create a Virtual Environment

Now ask the Assistant how you might create a virtual environment for a Python project:
👤 How can I create a virtual env?
You will see a response similar to this:
Step 1: Install Python
Ensure that Python is installed on your system. You can check the version using the command python --version.
Step 2: Open a Command Prompt
Open a command prompt or terminal window.
Step 3: Navigate to the Directory
Navigate to the directory where you want to create the virtual environment using the cd command.
Step 4: Create the Virtual Environment
Type the following command to create a virtual environment named venv:
| |
Step 5: Activate the Virtual Environment
Activate the virtual environment by running the following command:
| |
Step 6: Install Python Packages
Once the virtual environment is active, you can install Python packages using the pip command. For example, to install the NumPy package:
| |
Step 7: Deactivate the Virtual Environment
When you are done working in the virtual environment, deactivate it using the following command:
| |
Additional Notes:
- The
venvdirectory will be created in the directory where you ran the command. - The
venv/bin/activatescript is a shell script that sets up the virtual environment environment variables. - You can use the
pip freezecommand to list the packages installed in the virtual environment. - To remove a virtual environment, simply delete the directory.
Now that’s a lot of information! But it’s all useful. Let’s follow the steps (skipping the unnecessary ones) and create a virtual environment for our Streamlit app:
Open a terminal in Zed (CTRL + `) and run the following commands:
| |
Now you have a working ‘venv’. Let’s install Streamlit!
Ask the Assistant how to do that:
👤 Help me install streamlit to my venv
Step 1: Activate the Virtual Environment
Ensure that the virtual environment named venv is activated using the command:
| |
Step 2: Install Streamlit
Run the following command to install Streamlit within the virtual environment:
| |
Step 3: Verify Installation
Run the following command to check if Streamlit is installed correctly:
| |
Follow the steps and install Streamlit:
| |
After a while, you should see the Streamlit version:
| |
Create a Streamlit App
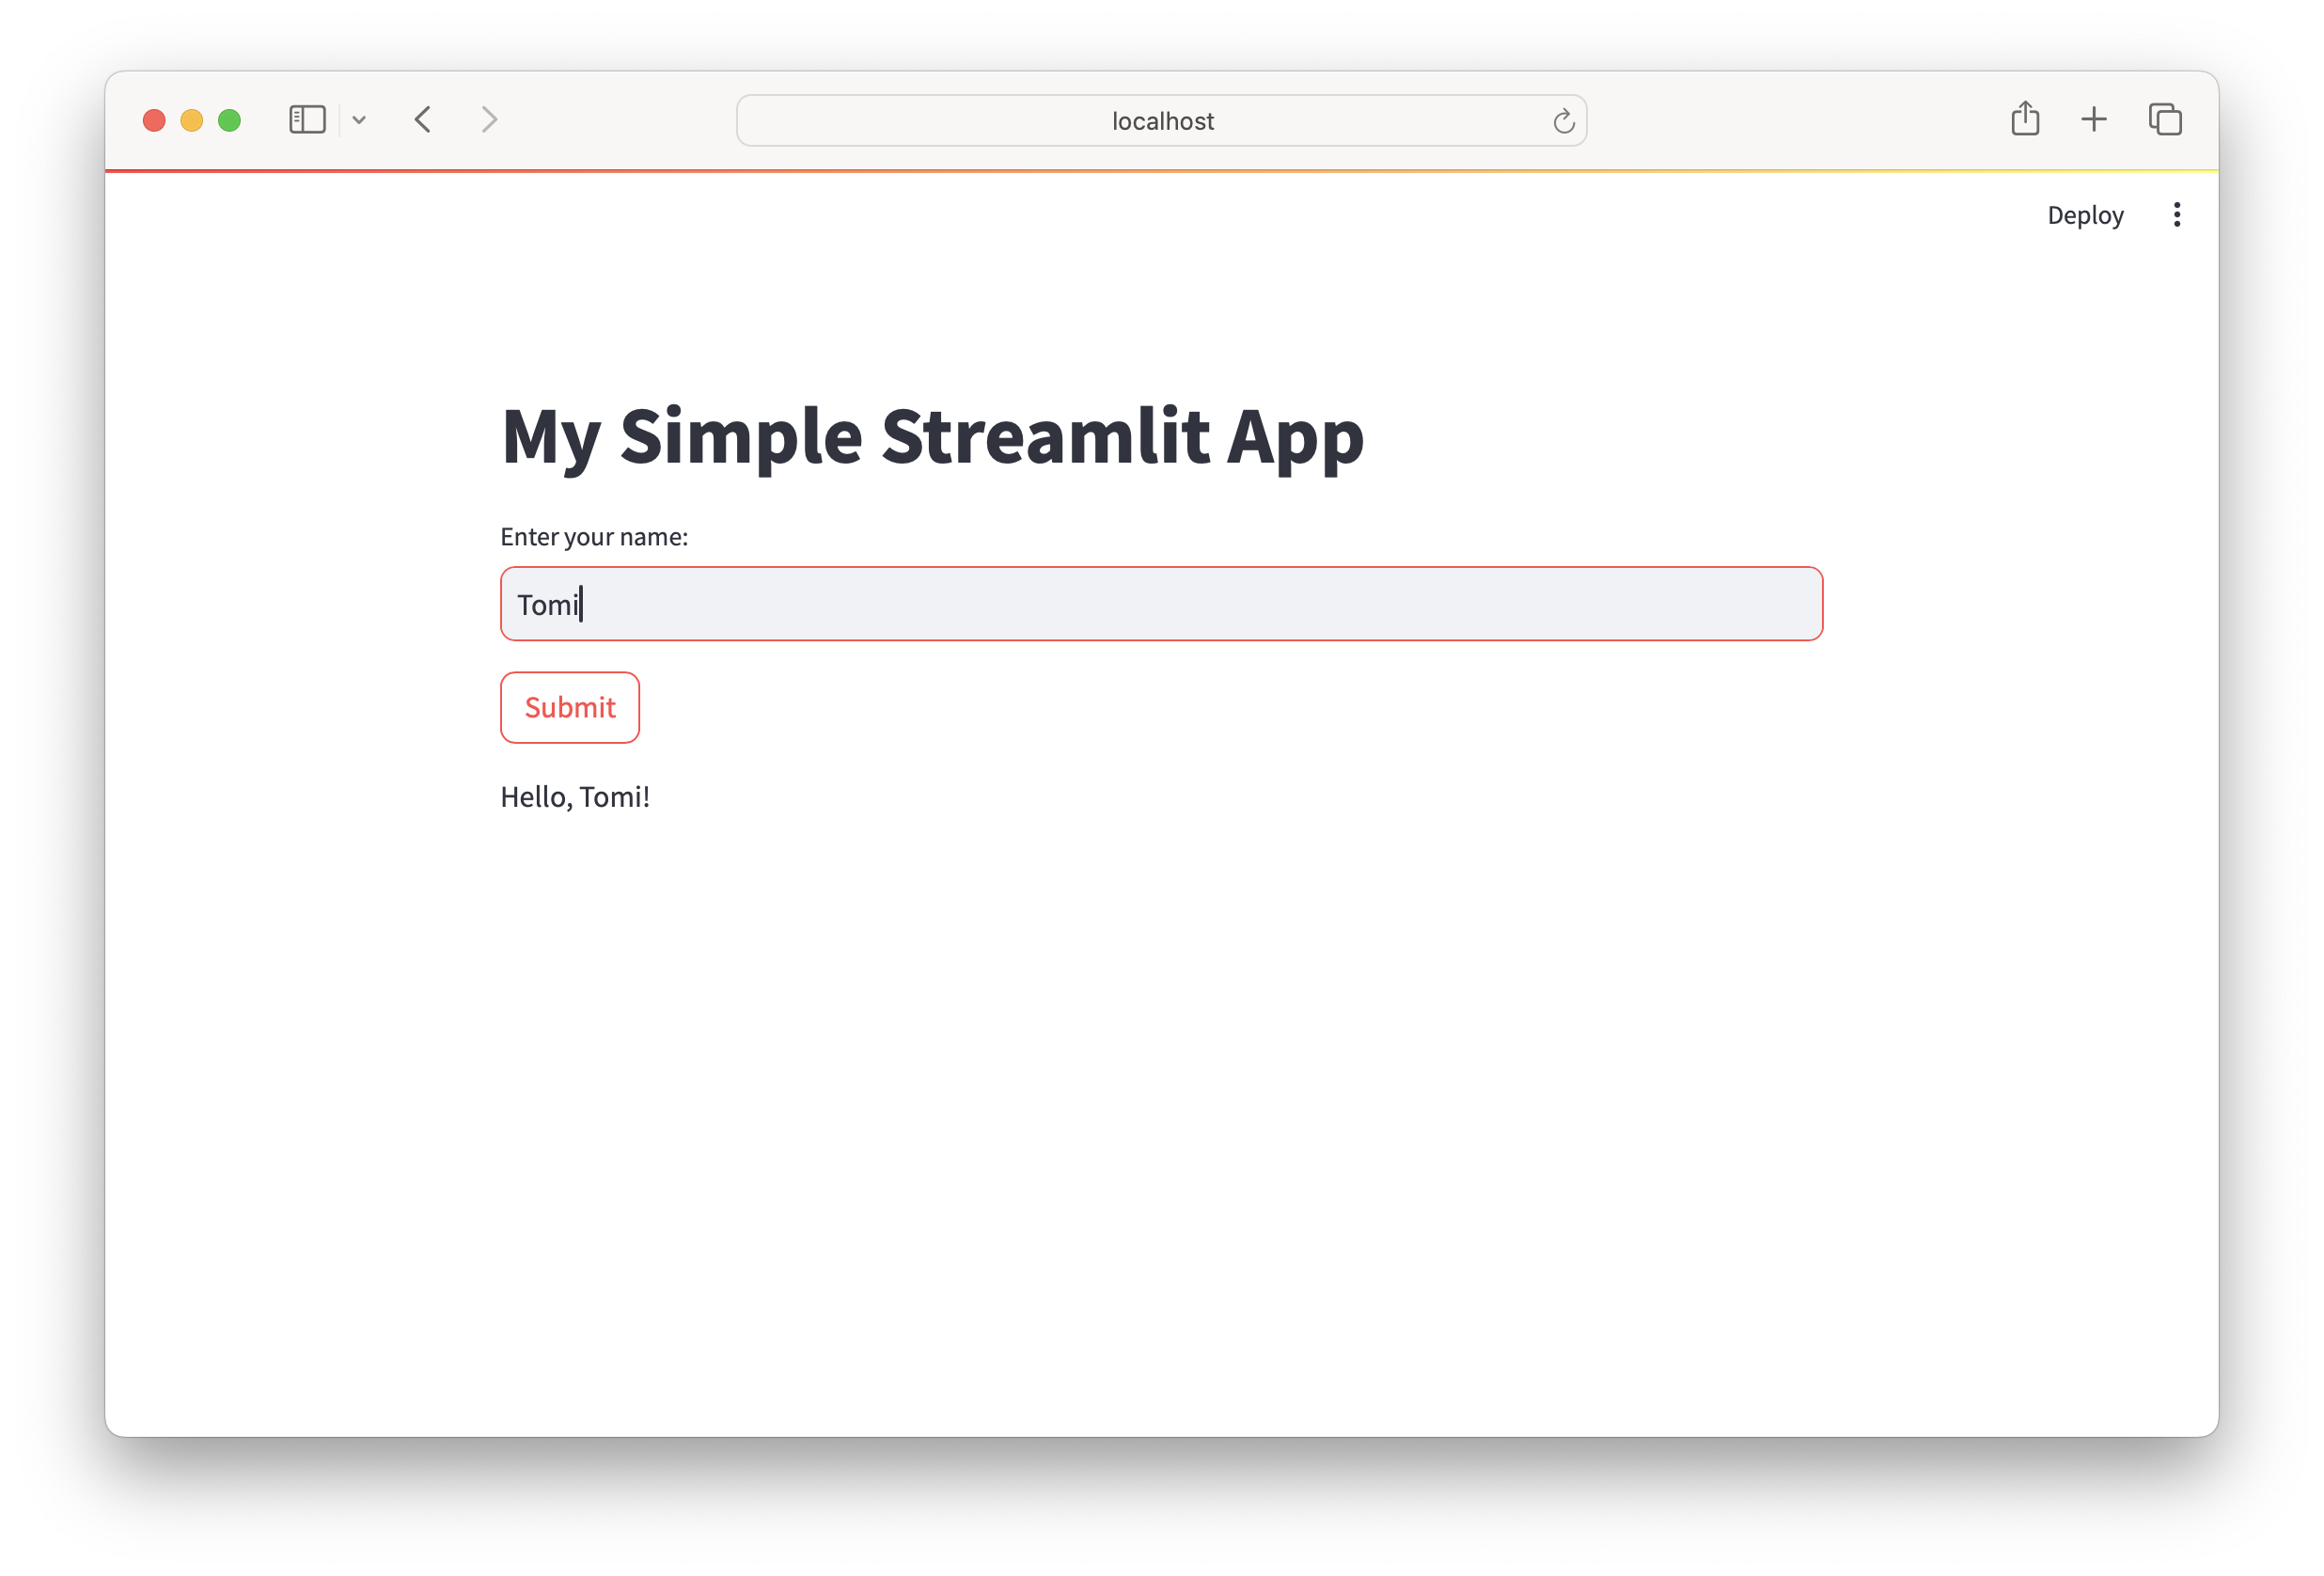
So far so good. Now let’s create a simple Streamlit app. For this, we will use the Inline Prompt feature of Zed. Create a new Python file in the directory - manually, oh my! - named app.py.
Open the file in Zed and ask the Assistant to scaffold a simple Streamlit app, using inline prompts:
- Press CTRL + ENTER
- This will open the context-aware, inline prompt. That might be familiar to you if you’ve used GitHub Copilot before.
- Type “create a simple streamlit app” and press ENTER
- If you are happy with the suggestion, press ENTER again to accept it.
The Assistant will generate the code for a simple Streamlit app:
| |
☝️ Please be aware that the Assistant might not always provide the exact code you need. Perhaps your version might be slightly different - hopefully even better than mine! 🙂
If not, iterate over and over again until you get the desired result. 👌
Be Efficient with Slash Commands
Now you have a simple Streamlit app. Save the file and run it… but how? 🤔
Of course! Ask the Assistant: open the Assistant panel again, and ask how to run a Streamlit app; but this time, we will provide the context. We want to know how to run our Streamlit application - not any Streamlit application.
Type /active and press ENTER - this will tell the Assistant to use the current file as the context for our question. Then ask:
👤 How can I run this app?
The Assistant will provide you with the necessary command to run the Streamlit app:
streamlit run app.py
Run the command in the terminal and open the provided URL in your browser. You should see your Streamlit app in action!
Congratulations! You have successfully created a simple Streamlit app using your local AI assistant in Zed! 👏
☝️ Before we wrap up, let me show you a more meaningful example of slash commands and context.
Open a new tab in the Assistant Panel (CMD + N) and type /active so the Assistant knows where to put new code. Now, ask it to put a link to my GitHub profile and some background info on the top of our Streamlit app:
👤 Put a text before the input box with a link to Tamas Csizmadia’s github profile and the city where he lives
The answer should be something like this:
| |
Now it seems like legit… but in reality my GitHub profile is ’tcsizmadia’ and I live in Kaposvár, not Budapest. We can’t fault the Assistant for this, as its foundational model contain a vast amount of information but not everything. Since I’m not a public figure, it’s understandable that the Assistant might not know much about me. 😞
Normally, we would turn to a solution called RAG (Retrieval Augmented Generation). This way we supply specific and relevant information to the Assistant as part of the prompt for reasoning and solving tasks. But can we do something similar with our local AI assistant? Absolutely!
Issue the following slash command:
/fetch https://github.com/tcsizmadia
By doing so, we instruct the Assistant to retrieve the content from my GitHub profile page and use it as context for subsequent queries. Now, go ahead and ask the Assistant to generate the code again. This time, it should be more accurate:
| |
Much better! 💪 This example demonstrates the power of slash commands, providing you with a better understanding of how they can assist you in your everyday coding tasks.
There are a lot of other interesting commands and aspects out there with Zed and its built-in AI assistant. For now, let’s wrap up the first part of my tutorial. I encourage you to explore Zed further and experiment with it before I publish the next part.
💼 Wrapping Up
Thank you for being with me this time! Let’s summarize what we have learned:
- We’ve set up Ollama and pulled two models:
llama3.1:8bandcodegemma:7b- although we only used thecodegemmamodel in this part, thellama3.1model will be used next time. - We configured Zed to use the
codegemmamodel as the default AI assistant locally, using Olla as the provider. - We created a simple Streamlit app following the instructions of our AI assistant in Zed.
- We learned how to use slash commands and context-aware prompts to interact with the AI assistant more efficiently.
I hope you enjoyed this part and learned something new. See you in the second part whenever you are ready! 👋