
🎒 Resources
📖 Introduction
In the previous post, we saw how to set up a simple AI Assistant that can be run locally. We’ve seen how to use Ollama as the local provider for LLMs, such as codegemma. Next, in the lightweight code editor, called Zed we’ve created a Streamlit app from scratch. Finally, we learned how to provide context to the assistant using slash commands.
Today we will use Visual Studio Code as our IDE, extending it with Continue, the “leading open-source AI code assistant”.
💾 Preparing the Models
If you followed the previous post, you should already have the codegemma model (for code generation) and the llama3.1 model (for chat). Now we need a third one - for the embeddings. So we should pull that one now. But wait…
What are embeddings? This topic deserves its own post or even a series. In short, embeddings allow us to represent words or sentences in a vector space, making it possible to understand relationships between semantically similar words. Continue will turn to the embeddings model to create vectors, when you ask something related to the whole codebase, such as “create unit tests for my GreetingService” or “where should I put my code for a new endpoint?”. Those vectors will be indexed in a vector database, and the assistant will use them to provide more accurate suggestions quite swiftly.
Okay, let’s pull an embeddings model. We will use the nomic-embed-text model, which in fact, the recommended model by the Continue team.
| |
This model is relatively small, so it should be quick to download.
🔧 Setting up VS Code & Continue
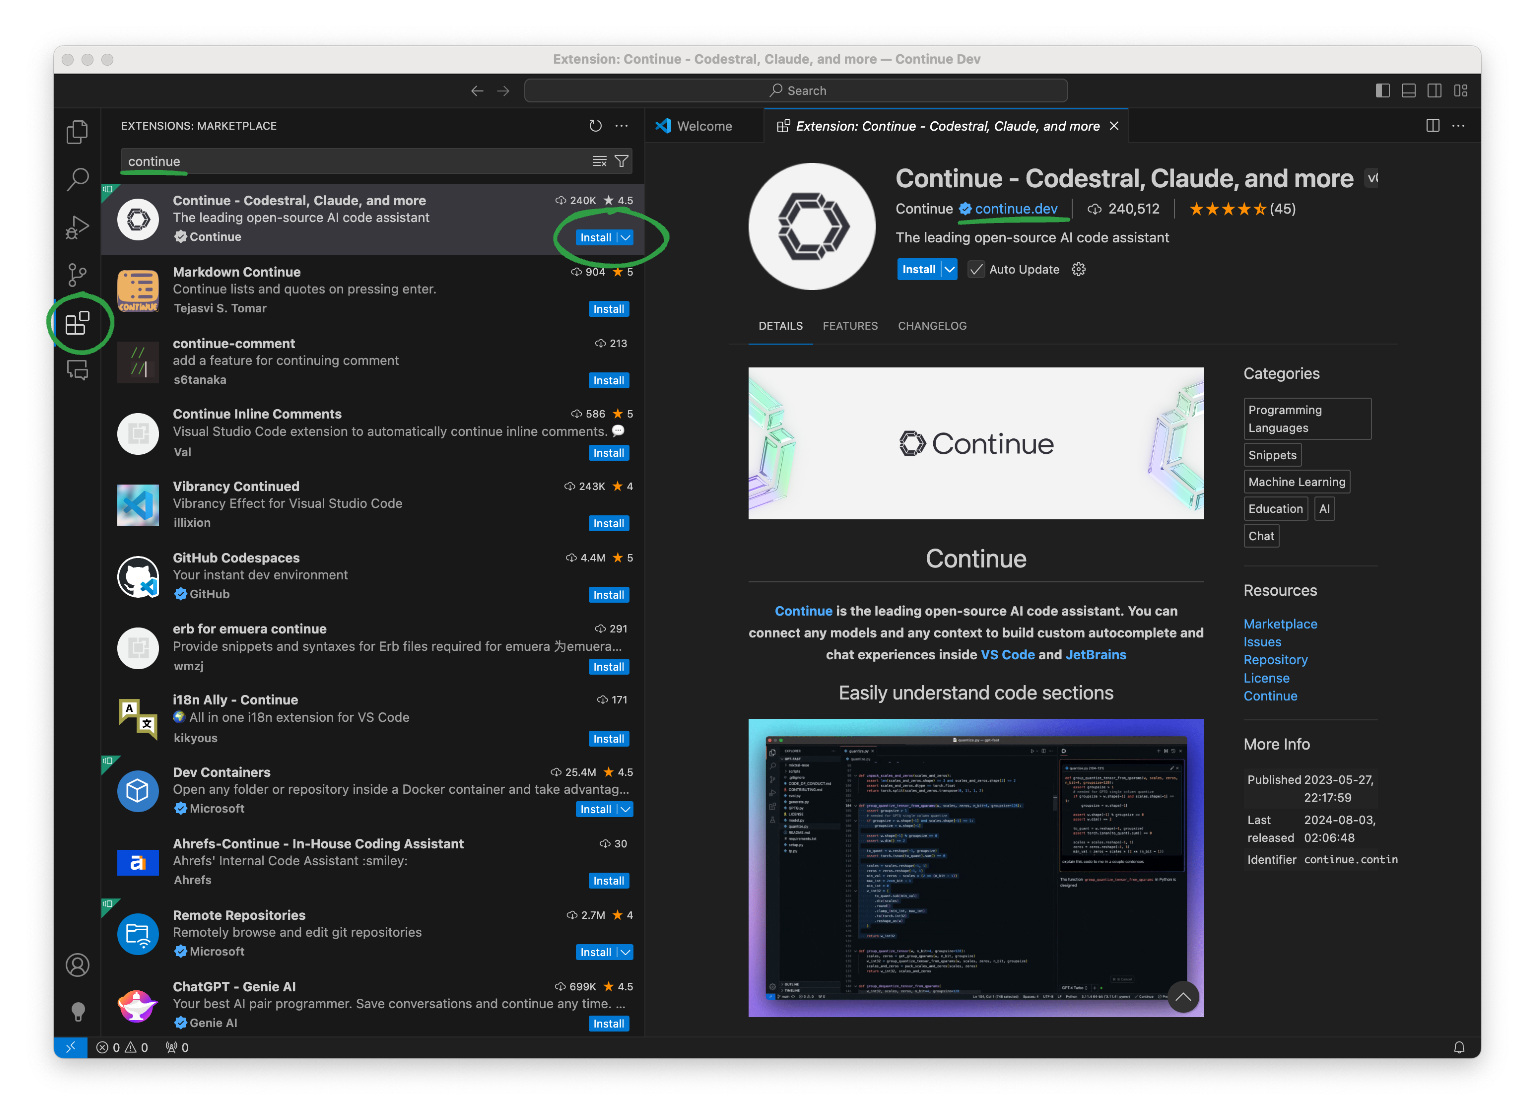
Currently, Continue supports Visual Studio Code, and JetBrains IDEs. For this tutorial, we’ll focus on VS Code because it is lightweight, popular, and free to use. I assume you already have it installed and you know how to use it. So let’s install the Continue extension:
- Open the Extensions view and search for
Continue. - Make sure you selected the extension published by Continue.dev.
- Click on the Install button.
Configure Ollama as the Provider
I’ll show you two methods how to get up and running with Ollama in Continue:
1., Configure Within the Extension: First, open the Continue panel from the toolbar, or from the Command Palette (CMD or CTRL+SHIFT+P). In the panel, click on the dropdown menu in the input box to add, or configure models at any time. Since this is your first time using the extension, you should only see the Add Model option with a plus sign.
- Choose Add Model.
- Select Start with a provider.
- Scroll down to Ollama and click on it.
- Click on Autodetect - this will populate all the models we have pulled previously.
- Before prompting, make sure the chat model is set to
llama3.1:8binstead of the embedding model - that model is not capable of generating text.
…And that’s it! You have a working setup with Ollama and Continue in Visual Studio Code. 🎉
2., Edit the config.json file directly: Open the Command Palette and search for Continue: Open config.json command. Don’t worry if you feel overwhelmed, the important pieces will be discussed in detail later, now here is the config.json file with the same settings we have set up in the previous method:
| |
Apply the changes and save the file, and you are all set!
✨ Working with Continue
Before we begin, could you please move the Continue panel from the left toolbar to the right side? 🙏 You’ll thank me later.
This way, you can operate with the AI Assistant even when the Explorer panel is open. Speaking of which, let’s open the ‘project’ we’ve created in the previous post. Hit CMD/CTRL+O and navigate to the streamlit app folder.
Commands, Context and Autocomplete
We’ve seen how to use slash commands in Zed to provide context and influence the assistant’s behavior. Needless to say, Continue has its own set of commands and other features to provide the same functionality (and even more).
For starters, let’s ask the assistant to explain the code in the app.py file:
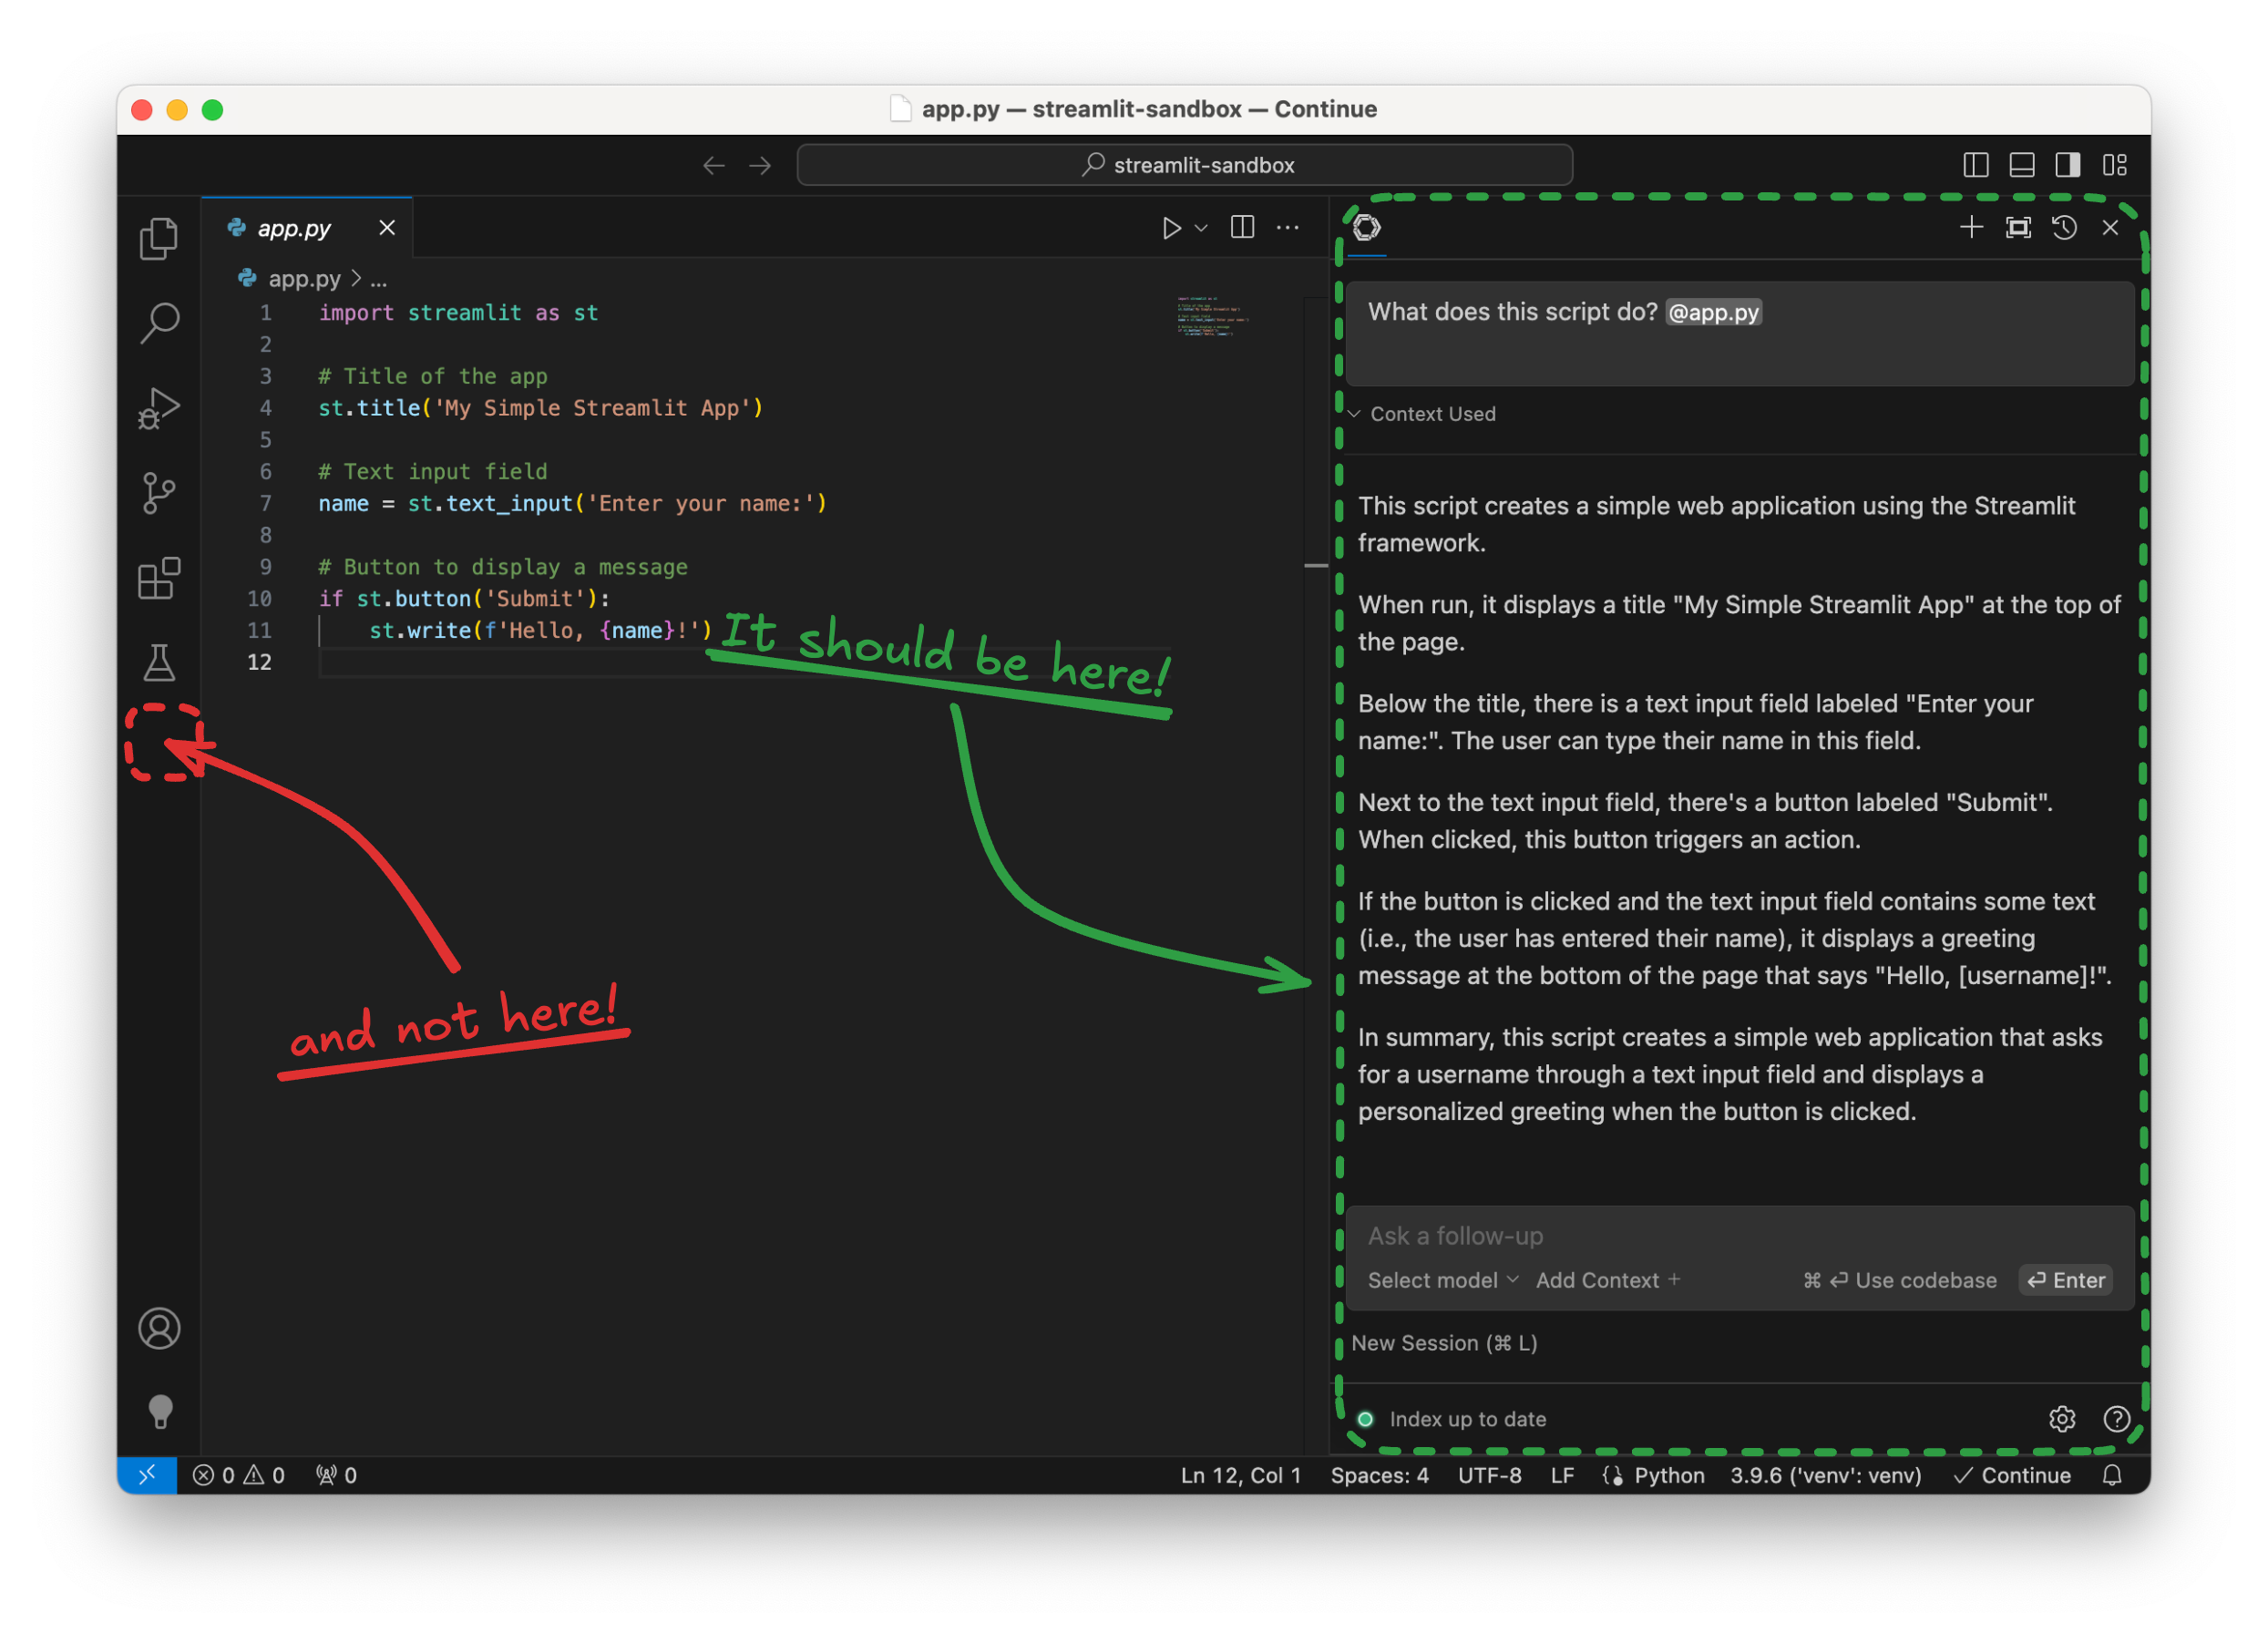
👤 What does this script do? @app.py
Note the @app.py at the end of the message: in Continue, we use the @ symbol to provide context to the model. In this case, we want the assistant to focus on the code in the app.py file.
Here is the response I got:
This script creates a simple web application using the Streamlit framework.
When run, it displays a title “My Simple Streamlit App” at the top of the page.
Below the title, there is a text input field labeled “Enter your name:”. The user can type their name in this field.
Next to the text input field, there’s a button labeled “Submit”. When clicked, this button triggers an action.
If the button is clicked and the text input field contains some text (i.e., the user has entered their name), it displays a greeting message at the bottom of the page that says “Hello, [username]!”.
In summary, this script creates a simple web application that asks for a username through a text input field and displays a personalized greeting when the button is clicked.
I would not have explained it better myself! 👏
Harnessing the Power of Embeddings
Let’s say I want to refactor my Streamlit application by extracting the greeting widgets into a separate tab. This way, I can add a second page (tab). It’s a long shot for a Java developer, but let’s see how the assistant can help me achieve this.
I will use the Streamlit API reference as guidance. Actually, I will ask the assistant to guide me through the process. But first, I am going to help the assistant a little bit.
Continue comes with popular references and manuals pre-indexed. Unfortunately, Streamlit isn’t on the list. I’ll show you how to let Continue to index any reference from the web.
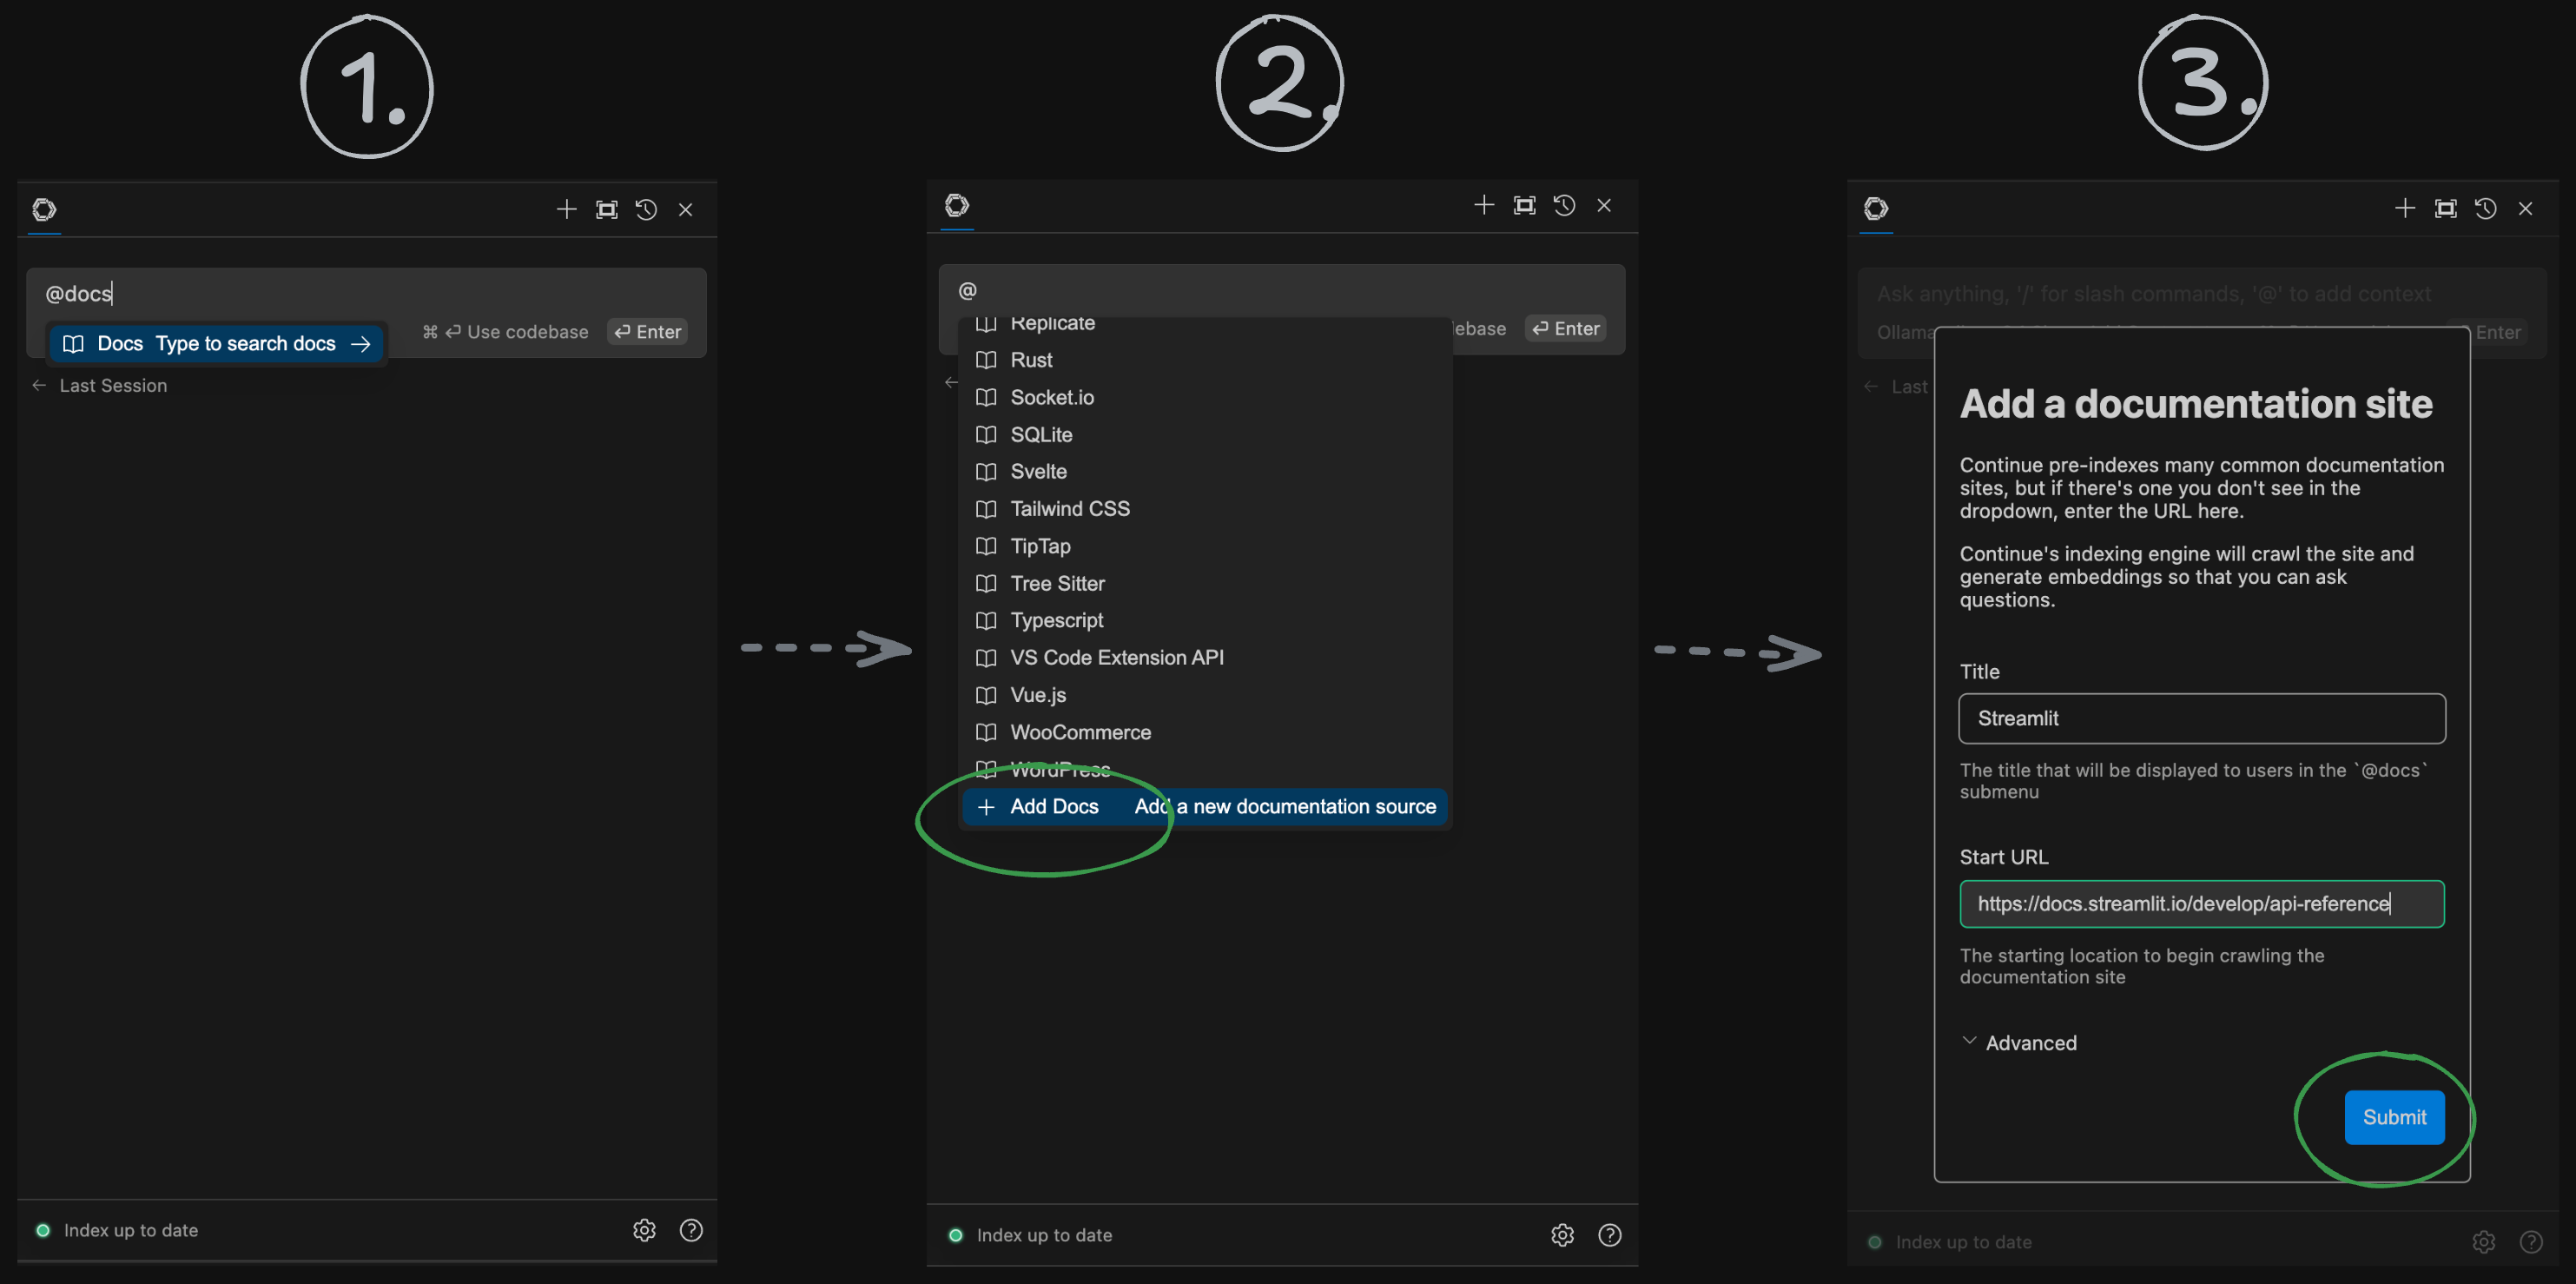
First, trigger the
@docscontext provider. As you scan through the list of pre-indexed documentations, you can see that Streamlit is missing.Go to the bottom of the list and you should find the + Add Docs option. Click on it.
In the dialog, add a title to the documentation, like
Streamlit.Paste the URL of the
https://docs.streamlit.io/develop/api-reference.Click Submit.
You will be notified when the reference has been indexed.
Now we can work on the changes in the code. Give some instructions to the assistant pointing out the Streamlit API reference (using @Streamlit):
👤
@Streamlit@app.pyPlease add two tabs to this Streamlit application.
The first tab should hold the current content
The second tab should called “About Me” and contain some placeholder text so I can add content later
Before we start to examine the response, I need to emphasize two things.
Please pay attention to the Context Used section below the input box. It shows the context the assistant used to generate the response:
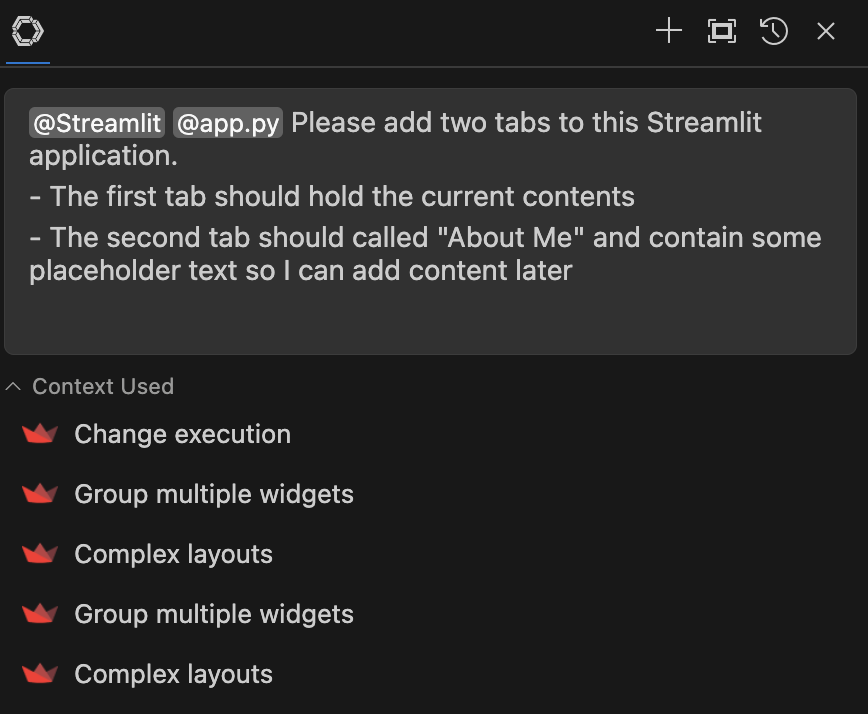
These entries are clickable, and will take you to the exact location of the subject in the Streamlit API reference (eg. Complex layouts).
This is my first good advice: always verify the information the assistant provides. As you may know, AI models can sometimes hallucinate and provide incorrect information.
Secondly, as the complexity of tasks increases, the rule above will become exponentially true. I use very straightforward examples here on purpose: to demonstrate a feature or concept without getting lost in the details. In our daily work, we will likely have to solve much more complex tasks, which, if we want to solve with the help of an AI Assistant, will require multiple iterations of prompting.
☝️ Always balance the time spent interacting with the assistant against the time you would spend solving the problem yourself. Remember, the AI is just a tool, but you are the expert.
Alright then, let’s see what we got:
To add two tabs to your Streamlit application, you can use the st.tabs function. Here’s an updated version of your code:
| |
In this code, we create two tabs using st.tabs(["Home", "About Me"]). We then use the with statement to specify which content should go into each tab. The first tab (tab1) holds the original contents, and the second tab (tab2) contains placeholder text that you can replace later with your own content.
Applying the suggestions, you should see the new layout in the Streamlit app:
Slash Commands
In the previous post, we’ve seen how slash commands provide a powerful way to interact with the assistant. While Continue includes several built-in commands, the fun part is that you can create your own commands.
Start with a built-in command and ask the assistant to replace the placeholder text with something more meaningful.
- Highlight the code block in the second tab:
| |
Now press CMD/CTRL+L to include the code snippet in the input box.
- Use the
/editcommand to ask the assistant to replace the placeholder text:
👤
/editReplace the placeholder text with information about me. I am Tamas Csizmadia, a Java Developer from Hungary. Include a link to my GitHub profile: https://github.com/tcsizmadia
In the code editor, the assistant will show you the diff of the changes it suggests. If you agree with the changes, you can apply them by clicking the Accept All ✅ button (or pressing CMD+SHIFT+ENTER).
| |
A bit vague, but eventually I got what I asked for.
Create a Custom Command: Cleanup
Another neat feature of Continue is the ability to define custom commands. This lets you extend the assistant’s capabilities and tailor it to your workflow. You have two options:
- Define a command using natural language in
config.json - Craft more advanced logic using TypeScript in
config.ts
The latter is more powerful, as you can access aspects of the Continue SDK. But for the sake of simplicity, let’s stick with the natural language approach, as it is easier to understand, yet powerful enough for most use cases.
Open the config.json file (CMD+SHIFT+P and search for Continue: Open config.json) and add the following entry to the customCommands array:
| |
After saving the file, you can use the /cleanup command to ask the assistant to clean up the code. Let’s see it in action! 👏
Normally I would never ask a developer to do this, but please put some garbage into the code in app.py. Here is an example:
| |
I’ve added two unneeded import statements (json and csv), some commented-out code, a few TODO comments, and some print() statements. Now, let’s ask the assistant to clean up the code:
👤
/cleanup @app.py
Here’s the updated code:
| |
If you are satisfied with the result (as I am), you can apply the changes to the editor clicking the Apply to current file button - just make sure that app.py is the active tab in VS Code.
Autocomplete
One of the greatest features of GitHub Copilot is the so-called ‘Ghost Text’. As you type, the Assistant predicts your intentions and completes the code for you. While the results aren’t always perfect, when it works, it’s incredibly satisfying and helps you get into the flow. ✨
This feature is currently beta in Continue. To try it out, specify a compatible model in the config.json in the tabAutocompleteModel entry. Let’s try it with the recommended model, the starcoder2:3b:
| |
An uncomplete, very subjective and somehow biased summary of the models I’ve tried so far with Continue:
| Model | Description | Preference |
|---|---|---|
starcoder2:3b | Recommended by the Continue team. Well balanced between performance and responsivity | ⭐ ⭐ |
deepseek-coder-v2:6b | Very powerful, the performance and accuracy is in par with ChatGPT-4o (in coding tasks). In turn, it requires more resources, and the first response can be slow. | ⭐ ⭐ ⭐ |
deepseek-coder:1.3b | The ’light’ variant of the above model. Use it as a last resort, if you’re on a modest machine, since it hallucinates a lot. | ⭐ |
codegemma:2b | This is my go-to model for code generation tasks. Unfortunately, it is not supported by Continue yet 😭 | 🤷 |
So if you ask me…
- I would go with
deepseek-coder-v2:6bfirst, as it performs very well in coding tasks. - If you experience lagging, timeouts or autocomplete puts a heavy load on your machine, you can switch to
starcoder2:3b. - If you’re still not satisfied with the responsiveness, you may try
deepseek-coder:1.3b(and always double-check the suggested code 👮♂️).
Hopefully my favorite model, codegemma will be supported soon. 🤞
Peek Under the Hood
Before wrapping up, I’d like to invite you to explore how the assistant interacts with local models. If you started Ollama from the GUI, please stop it now. Then, open a terminal and start Ollama with the following command:
| |
After a while, Ollama would be up and running. Split the screen and put the terminal on one side and VS Code on the other - or place the two windows side by side. Now, start editing the app.py file and implement a ‘Quote of the day’ feature inside the ‘About Me’ tab. Please do not chat with the assistant, instead leverage the ‘Ghost Text’ feature to complete the code:
| |
As you type, keep an eye on the terminal window. You can observe the exchange of requests and responses between Continue and Ollama.
Continue constantly calls Ollama’s "/api/generate" endpoint to ask for completions. Peel your eyes and you’ll see an extra POST request to the /api/embeddings endpoint whenever you save your files.
💡 Continue knows your actual codebase by maintaining a real-time index using embeddings. This enables it to provide more accurate suggestions and context-aware responses tailored specifically to the project you are working on.
💼 Conclusion
We’ve learned how to set up and use a more advanced solution for running AI Assistants locally. We’ve seen how easy to set up and configure the VS Code code editor with such great and powerful tools like the Continue extension and Ollama. We’ve explored the main features through simple examples, and I hope you now have a sense of how these tools can enhance your developer workflow.
Finally, here comes the million-dollar question: is it worth it? Or should you stick to commercial solutions like GitHub Copilot? 🤔
Although Continue is still in its early stages compared to GitHub Copilot, it shows a lot of potential and can significantly help developers in their daily tasks. Let’s examine some pros and cons:
🔒 As your intellectual property (the code) never leaves your machine, you can be sure that you are safe from IP leakage. This is a huge advantage, allowing you to start using AI Assistants in your projects even if you have had privacy concerns before.
⛔ Furthermore: since it operates on your machine, this solution is likely the only one that can be used in air-gapped environments. This opens the door for using AI Assistants in highly secure environments (think about industrial, financial or military settings).
✂️ The customization options are excellent. You can define your own commands and switch between models easily. Additionally, you can fine-tune a model to meet your specific needs. Since privacy concerns are addressed, you can include your Jira tickets, MRs or internal documents in to the context to improve the assistant’s suggestions.
📝 I didn’t mention this earlier, but Continue collects data - locally ☝️ - about how you write code and work in general. This enables the assistant to adapt to your style and provide more accurate suggestions. The promise is that the more you work with the assistant, the better it will get.
💰 …and of course, using a local AI asssistant could save the subscription fee of a commercial solution.
On the other hand, there are some aspects that could be against going with a local solution:
⌛ The performance may not be as good as cloud-based solutions. Since the models are running on your machine, many factors can affect the responsiveness of the assistant. The quality of the suggestions can vary depending on the model you choose, the resources available on your machine, and the complexity of the task.
🐢 Don’t forget that hosting an LLM model locally requires a lot of resources. These resources will be taken from other tasks running on your machine. Also, it’s impossible to run the most powerful models on a personal computer, so you might not get the same quality of suggestions as you would with a cloud-based solution.
🐛 Neither local models, nor the Continue extension is a turnkey solution. You get what you paid for - you can expect advanced features polished by very talented engineers at GitHub, OpenAI, or other big companies. For a local solution, you need to be prepared to walk the extra mile yourself to get a commercial-grade experience. Although Continue is being developed rapidly, most features should be considered as beta. This early stage also means the business model is still unclear — what features will be free, what will be paid, and how much we will need to pay.
As you might have noticed, I’m very excited about Continue and the possibility of running AI Assistants locally, even on a laptop. While I’ll keep my GitHub Copilot subscription for now, I’m looking forward to making good use of Continue in my everyday work.
What do you think? Would you consider using a local AI Assistant in your daily work? How could it help you with your projects? Let me know in the comments below!
Until next time, happy coding! 👋