
Introduction
Back in time when I was only a Java backend developer, my days were pretty straightforward. In the morning, I would fire up my IntelliJ IDEA, open the project, and started working on my tasks. Things are a bit different now. Suddenly, I am no longer a specialist in one language or field, but a generalist who needs to switch between various tools and languages. Needless to say, the advent of AI Copilots and Assistants will only make this situation more complicated.
I’ve come to realize that VS Code has become my daily driver. I use it not only for programming tasks but also for crafting blog posts and presentations. However, I must admit that my setup has become quite chaotic.
This issue goes beyond having a bloated IDE setup. For instance, some projects ban GitHub Copilot due to client security policies. In such cases, I need to ensure the Copilot extension is disabled. Additionally, I have different preferences for different tasks. For example, when I’m writing a blog post or crafting a presentation, I’d like to use a different theme and font size than when I’m coding.
With Devcontainers you can create isolated development environments for your projects - including VS Code setups. While Devcontainers are fantastic, they may not always be the best option to keep things organized in VS Code. For a hands down solution, consider using profiles.
✨ VS Code Profiles
I’ve ignored profiles in VS Code for far too long. Although I knew this feature existed, I never took the time to set one up. Now, I regret not doing so sooner and can’t imagine my daily workflow without them.
What are Profiles for in Visual Studio Code?
Profiles are a straightforward way to manage your settings, extensions, and keybindings in VS Code. Like having a different copy of VS Code for each scenario, where profiles are the blueprints for these installations. You can create as many profiles as you want, and you can export them to share with your team, for example.
📐 Creating a Base Profile
To get the most out of profiles, I recommend creating a base profile first. Why is this important? While you can create a new profile from scratch, having a common base for all your profiles is much better. This way, you only need to set up common settings, extensions, and keybindings once in your base profile.
Here is how you can create a base profile:
- Open the command palette (CMD/CTRL + SHIFT + P) and start typing: ‘Profiles’.
- Select Profiles: New Profile….
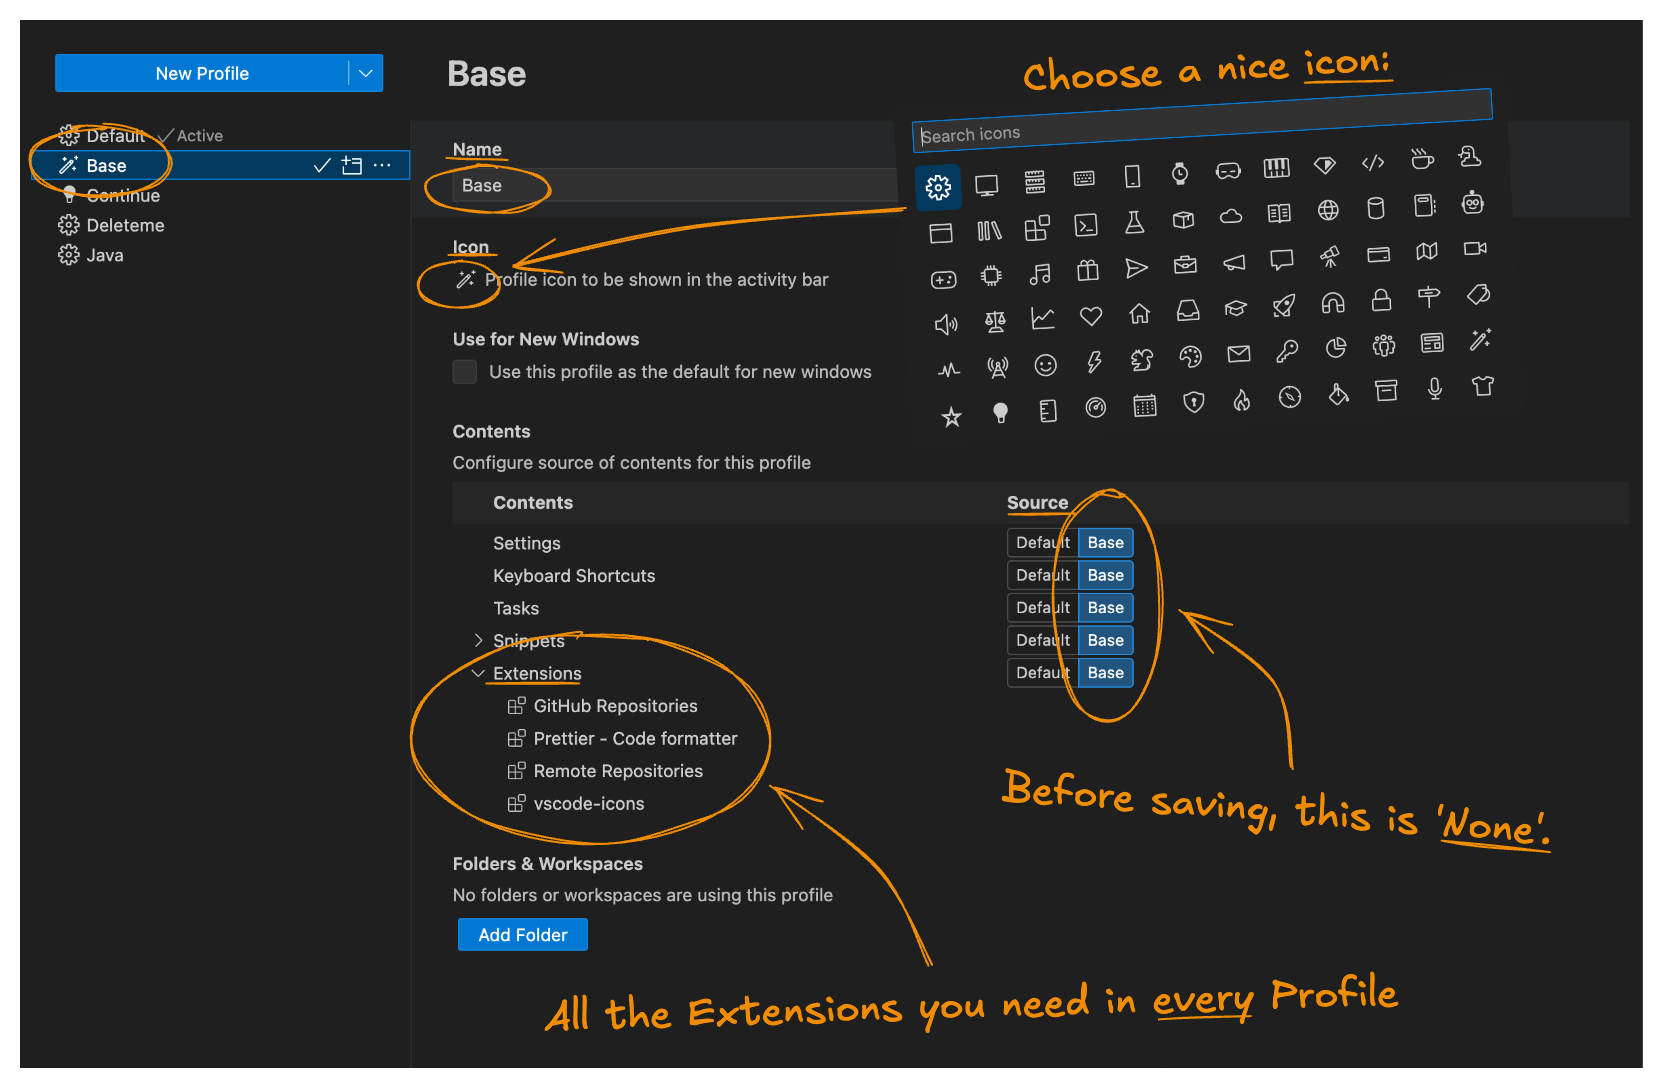
- Give your profile a meaningful name (I chose
'Base') and select a nice icon for it. - In the Contents section, make sure the Source for all the settings is set to None - this is important, as you don’t want to inherit settings from the Default, or any other profile.
- Finally, hit the Create button and click on the checkmark next to the profile name to activate it.
It might looks like you’ve made a factory reset of your VS Code, but don’t worry, all your stuff are still saved in the Default profile - you can switch back to it anytime.
Customizing the Base Profile
Now that you have a base profile, it’s time to customize it: add extensions, set up a theme, choose your favorite font, and more.
☝️ Remember: Only add or configure the settings that you want to have in all your future profiles. Avoid adding everything you think you’ll need in the future to this profile.
When setting up your base profile, consider your workflow and preferences. There’s no one-size-fits-all solution, so tailor it to your needs. I show you my current base profile settings below.
Extensions
I install only the bare minimum, even skipping GitHub Copilot. Why? Because if I need to avoid using it in some projects, I sleep better knowing it’s not installed. So, in my base profile, I have these extensions:
- Prettier - because whatever I work on, I want it to be well-formatted.
- CodeSnap - to create beautiful code snippets for presentations or documentation.
- vscode-icons - to pimp up the boring icons in the sidebar.
Theme
Add your favorite theme here and switch it up in other profiles if you need a change. Different themes and colors can help identify which profile you’re using. I recently switched to Nord and absolutely love it. No one around me uses it or even likes it, but I find it very stylish.
Font
I use GitHub Next’s Monaspace font for my code editing tasks. Again, choose a font that suits your eyes and workflow. You’ll probably end up using the same font for everything, so it’s best to set it up in your base profile now.
💡 Tip: Enable auto-saving for your edited files. It can dramatically improve your workflow. Check out this great explanation in the vscode.email newsletter.
Exporting the Base Profile
After finalizing all the details of your base profile, it’s time to test it out before setting it in stone. Open a new window with your newly configured profile.
- Open the command palette (CMD/CTRL + SHIFT + P) and start typing: ‘Profiles’.
- Select Profiles: New Window with Profile….
- Choose your base profile from the list.
- Open one or two of your projects to check if everything works and looks as expected. For now, ignore any missing extensions.
Before we move on, here’s a handy trick for storing, sharing, and reusing any profile you create. You can export your profile as a JSON file and import it later, anytime and anywhere. This is particularly useful for sharing your profile with team members. Here’s how to export your profiles:
- Open the Profiles view by clicking the profile icon in the status bar (the cog icon by default).
- Select the profile you want to export (e.g., the ‘Base’ profile).
- Click the three dots next to the profile name and select Export…
- Save the export file locally, but the real deal here is to share it as a Gist for easier importing later by pasting the Gist URL.

☝️ Remember, export file Gists are private by default. Always double-check for sensitive information before making them public.
Importing the Profile
Now that we’ve uploaded our profile as a GitHub Gist, let’s import it into a fresh VS Code setup. Open your favorite browser and go to the Visual Studio Code for the Web (vscode.dev) website. This is essentially VS Code - but in your browser. I’ll show you two ways to import your profile: the first works in both the browser and on your local instance; the second is browser-only.
- Open the Profiles view in the browser-based VS Code instance.
- Click on the dropdown next to the New Profile button and select Import Profile….
- Paste the Gist URL and hit Import. Here is mine Base profile: https://gist.github.com/tcsizmadia/901e451330691639137a9f3dc58ed0a9.
- Click on the Create button.
- Finally, make the imported profile active by clicking on the checkmark next to the profile name.
Nice! It’s quite easy to get up and running with all the important settings and extensions in a vanilla VS Code instance. Here’s a bonus tip: with vscode.dev, you can jump straight to the action by opening the profile directly using a URL like this:
| |
Replace the UUID-of-the-Gist with the actual Gist ID (open the Gist in your browser and copy from the URL).
For example, my profile’s URL is https://vscode.dev/editor/profile/github/901e451330691639137a9f3dc58ed0a9, where 901e451330691639137a9f3dc58ed0a9 is the UUID.
With this URL, you can preview and customize a profile in your browser, and then import it to your local VS Code instance by clicking the Create in Visual Studio Code button. I absolutely love this feature! 👏
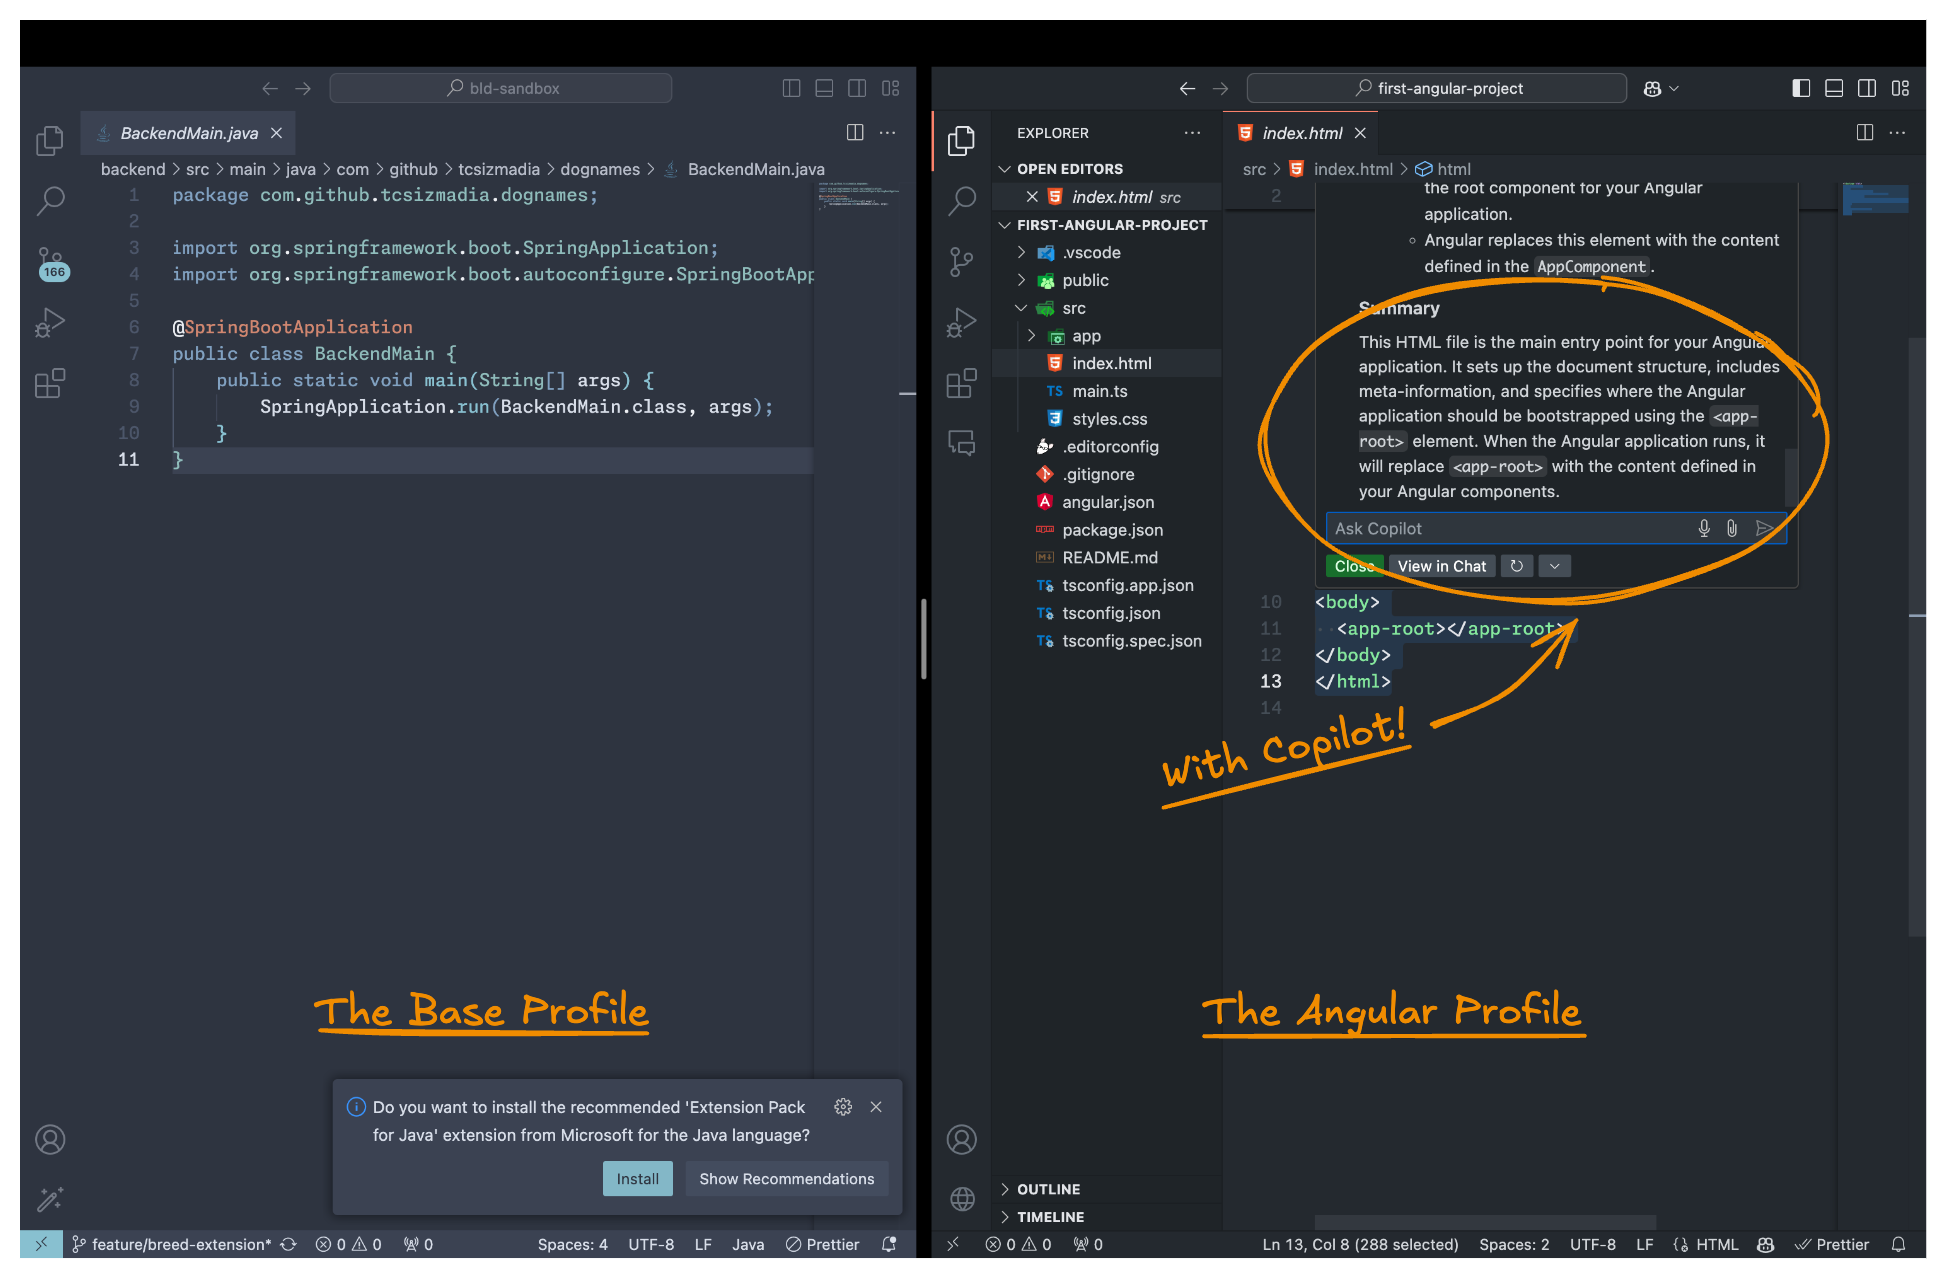
🔄 Creating a New Profile
We’re going to create a new profile based on the Base profile, specially tailored for Angular projects. As an Angular rookie, I’ll need all the help I can get from my trusty AI companion, GitHub Copilot - so I’ll include it in this profile.
- On the Command Palette, select Profiles: New Profile….
- Give your new profile a meaningful name (I chose
'Angular with Copilot') and select a memorable icon for it. - In the Copy from dropdown, select your Base profile.
- Hit the Create button and close this tab.
The easiest way to work with this in a new window is to use the Command Palette and execute the “Profiles: New Window with Profile…” command. Select the newly created 'Angular with Copilot' profile and press Enter.
Now, it’s time to install all the necessary extensions for Angular development. Since Prettier is already installed in the Base profile, you only need to add the Angular Language Service and Angular Snippets extensions.
Almost done! As mentioned earlier, I also want GitHub Copilot in this profile, so I’ve added it as well.
To clearly distinguish between profiles with and without GitHub Copilot, I prefer a different theme. For this profile, I chose the GitHub Theme. It’s a small change but provides a strong visual cue that I’m in the right profile.
From this point on, you can create as many profiles as you need for different types of projects or tasks. No more overbloated IDEs with unnecessary extensions, and no more mixing up your code style preferences. With the export/import feature, you can include your profiles in your projects or add a link in the README files to help your team members get up and running quickly.
Conclusion
Profiles in VS Code are a powerful feature that can help you keep your workspace clean and organized. By creating a base profile and customizing it to your needs, you can easily switch between different setups for different tasks. Whether you’re coding, blogging, or creating a presentation with Marp, profiles help you stay focused and productive. Uploading your profiles to GitHub Gists makes it easy to share them with your team or import them into a fresh VS Code instance.
I hope you found this quick…ish 😅 tip helpful. If you have any questions or suggestions, feel free to leave a comment below. Happy coding! 🚀